KÄYTTÖOHJEET USERGUIDES
Kolme työkalua äänisuunnittelijan arkeen. Jokaisesta on tässä työnkulku — ei ominaisuuslistaa, vaan se järjestys jossa niitä oikeasti käytetään.
Three tools for a sound designer's working day. Each one is described as a workflow — not a feature list, but the order you actually use it in.

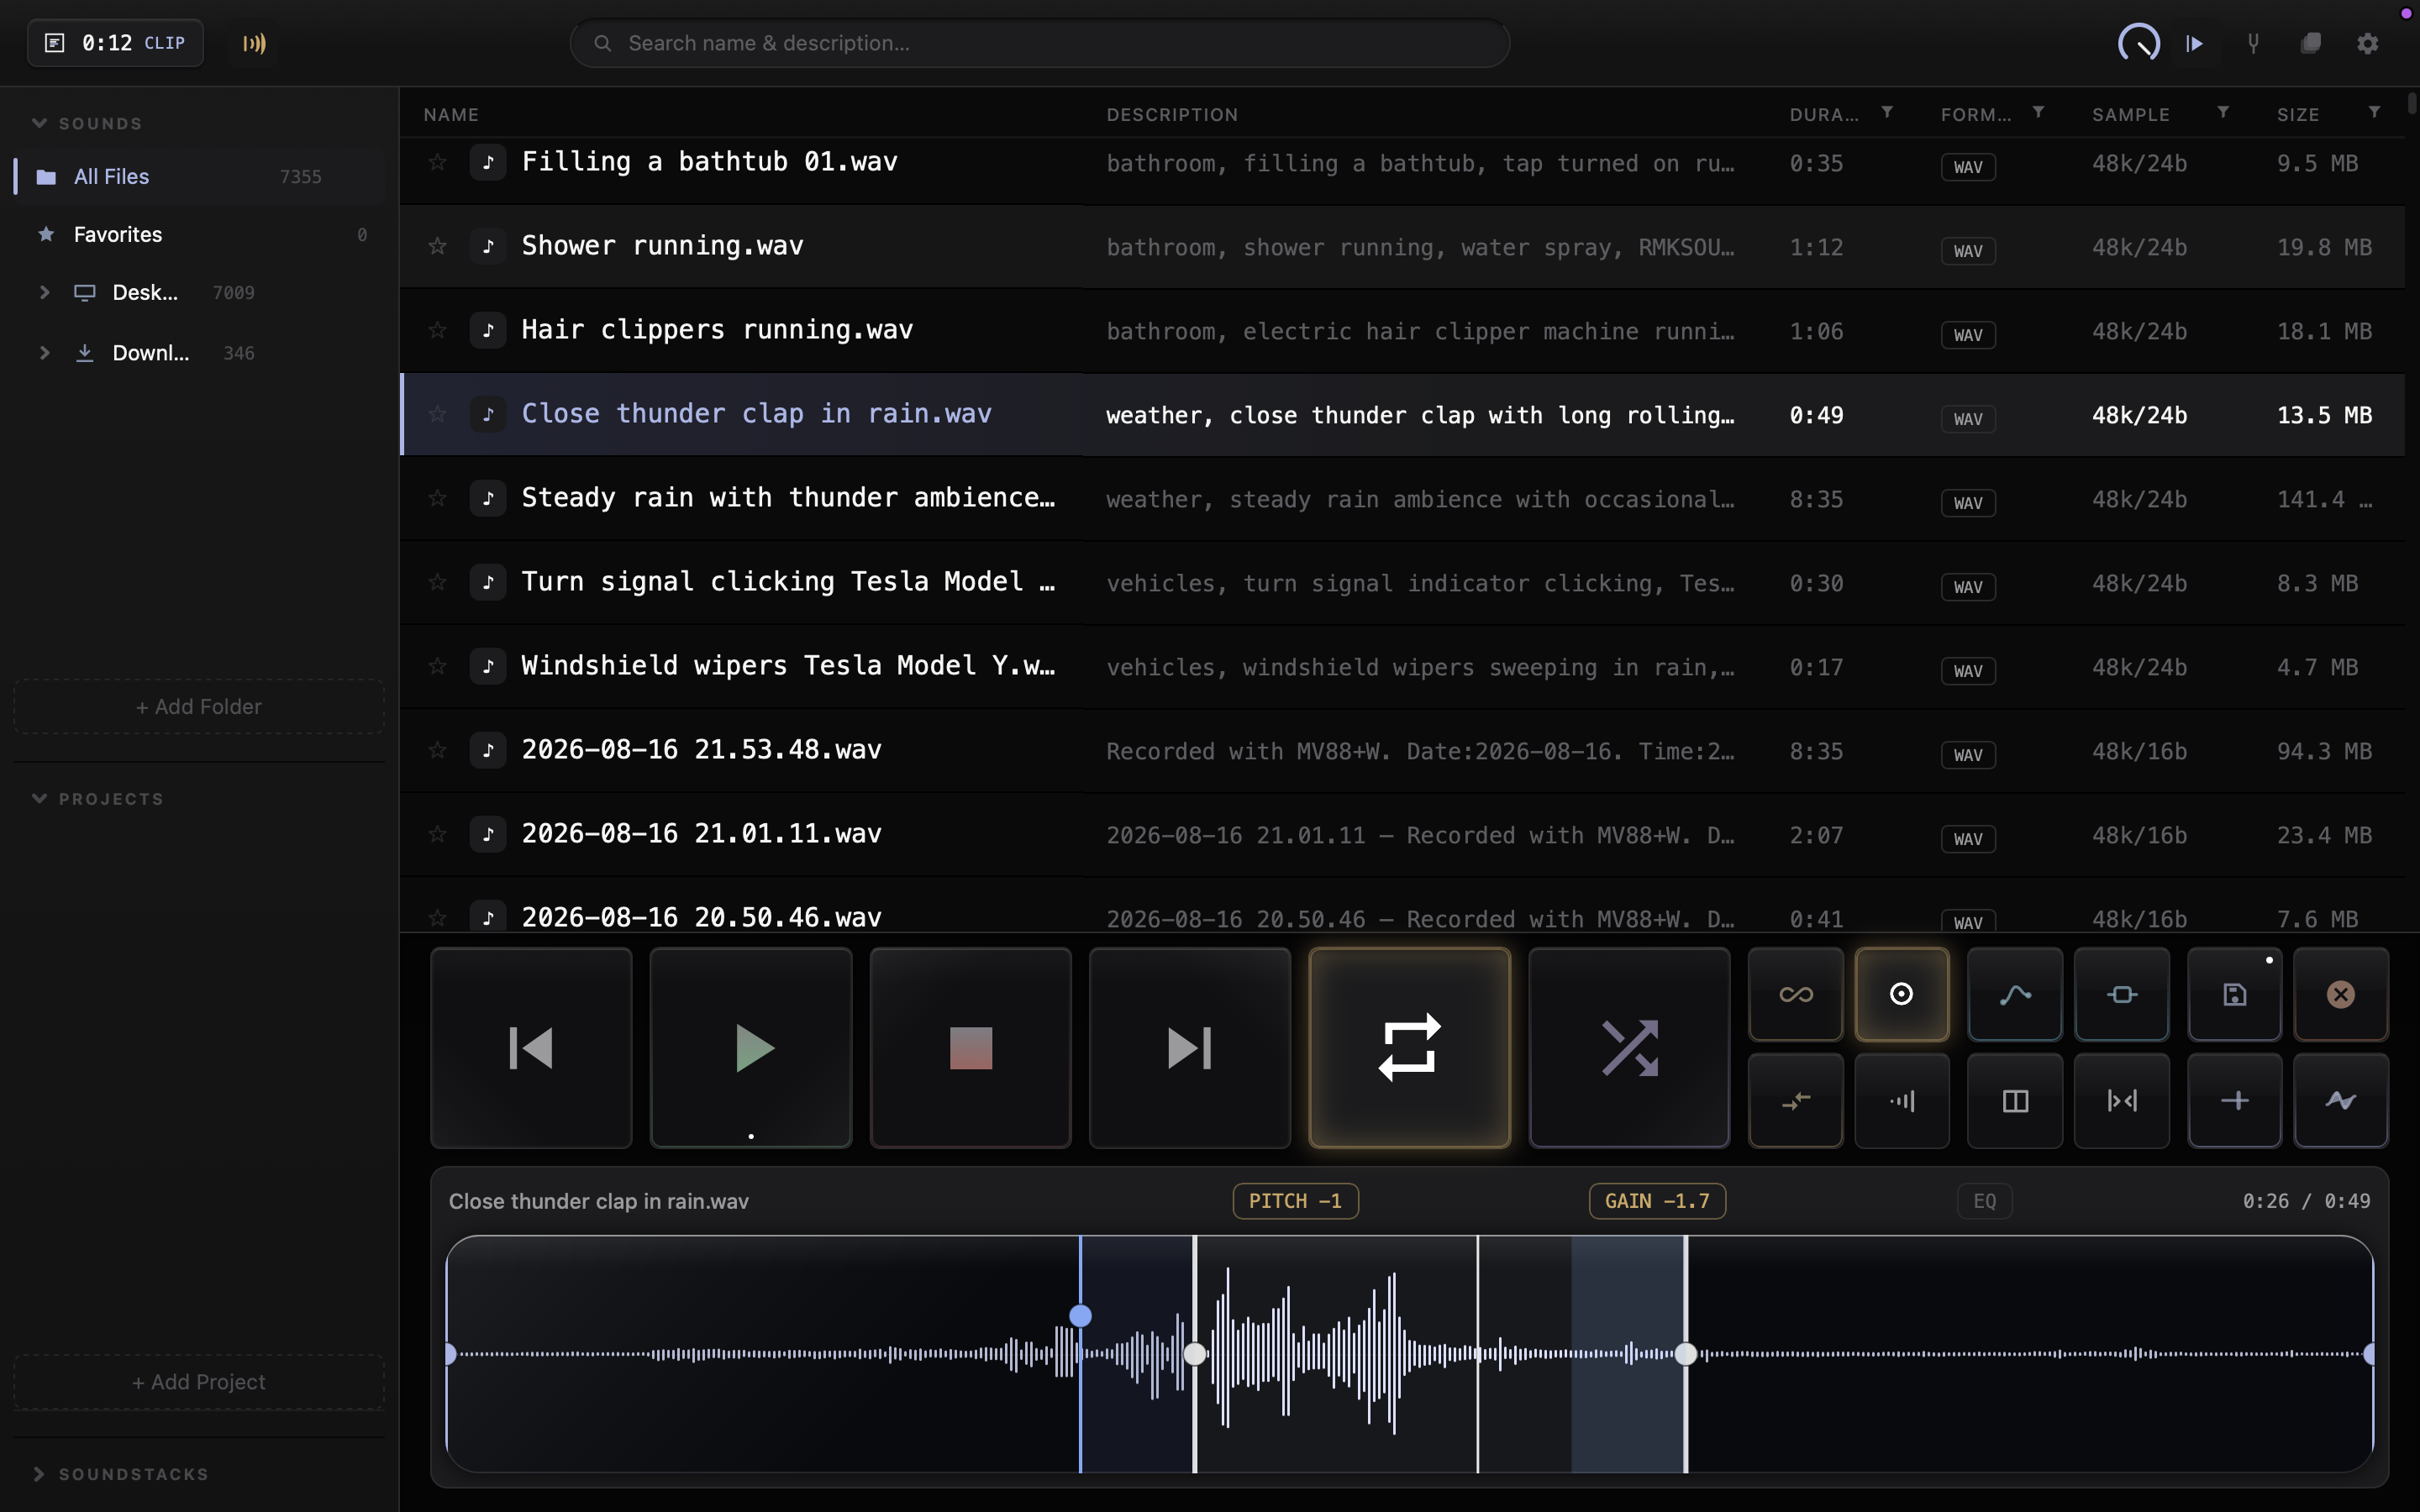
Kirjastoselain, kuljetuspainikkeet ja aaltomuoto — kaikki yhdessä ikkunassa.
Viisi minuuttia — koko työnkulku
- Lisää kansio (+ Add Folder tai ⇧⌘O). Tiedostot pysyvät paikallaan, mitään ei kopioida.
- Hae ja kuuntele: kirjoita hakuun, nuolet ylös/alas selaavat, välilyönti soittaa.
- Maalaa valinta aaltomuodolle (tai I ja O soittopään kohtaan). Loop päälle, Loop Match tekee saumasta saumattoman.
- Vedä yläpalkin kortista QLabiin — myös fullscreenissä. Tiedosto on valmis kun kortti lähtee kulkemaan.
1. Kirjaston lisääminen
Paina vasemmasta reunasta + Add Folder ja valitse kansio, jossa äänesi ovat. Skannaus käy läpi alikansiot ja lukee tiedostojen metatiedot taustalla — voit alkaa selata heti. Kansioita voi lisätä useita, ja All Files näyttää ne yhtenä listana.
Kansiorivin kolmio avaa alikansiot puuksi — klikkaus rajaa listan siihen kansioon, ja haku, shuffle ja liittäminen toimivat rajauksessa. Kirjasto ja projektit myös seuraavat Finderia reaaliajassa: levylle lisätty, poistettu tai siirretty tiedosto päivittyy listaan itsestään parissa sekunnissa ilman uudelleenskannausta.
Äänitiedostoja voi myös raahata Finderista suoraan SOUNDINDXiin: pudota ne PROJECTS- tai SOUNDS-kansion riviin, tai suoraan avoinna olevaan tiedostolistaan, jolloin ne kopioituvat näkyvillä olevaan kansioon. Näin esimerkiksi Logicissa bounssatut dronet siirtyvät suoraan näytelmän projektikansioon ilman välivaiheita.
2. Etsi ja kuuntele
Kirjoita hakukenttään — lista suodattuu kirjoittaessa. Nuolinäppäimet liikkuvat listassa ja toistavat tiedoston automaattisesti, jos Auto-play on päällä. Sarakkeita voi järjestellä ja piilottaa asetuksista.
Sarakeotsikoiden suodatinnapit rajaavat listan muodon, keston, näytetaajuuden ja koon mukaan. Rajaus tehdään kannassa, joten se pysyy nopeana myös satojentuhansien tiedostojen kirjastossa.
Useita tiedostoja voi valita kerralla: ⇧-klikkaus valitsee alueen ja ⌘-klikkaus lisää tai poistaa yksittäisiä rivejä. Valinnan voi raahata suoraan Finderiin tai muuhun ohjelmaan, Cmd+C kopioi valitut tiedostot leikepöydälle, ja rivivalikon Move to Trash siirtää koko valinnan roskakoriin yhdellä kertaa. Monivalinta siirtää alkuperäiset tiedostot sellaisenaan — FX, fadet ja pitch koskevat vain ladattua raitaa.
Sivupalkin Duplicates-rivi rajaa listan tiedostoihin, joista on kirjastossa useampi kopio (sama nimi ja koko), ja listassa kaksoiskappaleet on merkitty ⧉-merkillä. Yhdessä aluevalinnan kanssa siivous käy hetkessä: rajaa, valitse, roskakoriin.
Get Info näyttää tiedoston huippu- ja RMS-tason desibeleinä. Analyysi tehdään taustalla, joten pitkäkään tiedosto ei jumita käyttöliittymää.
Listassa voi myös kirjoittaa suoraan: kirjaimet hyppäävät nimen alkuun ("ra" vie kohtaan Rain) kuten Finderissa. / ja ⌘+F siirtävät hakukenttään, joka etsii myös tiedostoihin upotetuista kuvauksista. Työkalujen pikanäppäimet ovat ⇧-yhdistelmiä, joten kirjoittaminen ei koskaan laukaise työkalua.
3. Rajaa se osa jonka haluat
Aivan raidan reunoilla ovat omat alku- ja looppurajaimensa — korostevärillä erottuvat kahvat, jotka rajaavat koko raidan käytössä olevan pituuden ja vaikuttavat sekä toistoon että vientiin. Kesken raahauksen koko tiedosto tulee hetkeksi näkyviin, jotta voit vetää rajainta jo rajattuun suuntaan; irrottaessa näkymä tiivistyy taas rajattuun alueeseen. Rajainten sisäpuolelle maalataan tavallinen valinta vetämällä aaltomuodolle — sillä toimivat Loop, Loop Cycles, Reverse Loop ja muut alla. Valittu alue korostuu: se saa kehyksen ja valinnan ulkopuoli himmenee. Rajaimista voi tarttua pallosta, ja kaksoisklikkaus vie valintarajaimen raidan alkuun tai loppuun.
Yläkulmasta vedetään fade auki. Fade seuraa aina alku-/looppurajainta, myös kun sitä raahataan jälkikäteen — pelkkä valinta ei koskaan vaikuta fadeen, eikä valinnan tekeminen fadejen päälle sekoita niitä yhteen.
- Loop — alue kiertää; ilman aluetta koko raita. Tavallinen Loop soittaa tasan valitun äänen ilman feidejä tai saumaa — esikuuntelu kuulostaa samalta kuin vienti.
- Loop Cycles — soittaa valinnan N kertaa ja pysähtyy. Kierrosluku on CYCLES-merkissä PITCH/GAIN-merkkien vieressä (oletus 2): raahaa pystysuunnassa tai rullaa, tuplaklikkaus palauttaa 2. Vienti tuottaa täsmälleen N kierrosta yhtenä tiedostona, ja Fade in / Fade out composition (export-kortin oikea klikki) häivyttää koko tuloksen alun ja lopun — esimerkiksi 10 kierrosta sadetta, joka alkaa ja loppuu pehmeästi, valmiina QLabiin.
- Smart Snap (magneetti) — transienttitilassa raidan iskut piirtyvät aaltomuotoon iskuruudukoksi, ja valinnan sekä reunarajainten veto napsahtaa merkistä toiseen. Ruudukon tiheyttä säädetään säätöpalkin GRID-lukemasta: arvo on desibeleinä raidan kovimmasta iskusta (esim. −26), ja korkeampi arvo jättää näkyviin vain kovimmat iskut, kuten basarin ja virvelin. Valinnan rajaimet seuraavat säätöä heti. GRIDin power on sama kytkin kuin magneetti; ⌥-veto liikuttaa rajainta vapaasti, ja magneetin sammutus jättää rajaimet siihen mihin ne napsahtivat. Oikean klikin valikosta tila (transientit / nollakohdat) ja pikatasot Hard / Medium / Soft.
- Reverse Loop — alue soi edestakaisin. Loop Match toimii tässäkin: kääntökohta ristihäivytetään rajan ulkopuolisella äänellä, ja sininen kahva säätää pituuden.
- Reverse — kääntää aineksen; alue tai koko raita.
- Show only selected area — rajaa valitun alueen uudeksi alku-/looppurajaimeksi (sama kuin Clip to Selection). Rajattu alue on suoraan loopattava: Loopin voi kytkeä myös vasta rajauksen jälkeen.
Track Volume ja Automation piirtävät äänenvoimakkuuden ajan yli. Raahaus (tai Cmd) siirtää koko valmiin käyrän kerralla ylös tai alas; raahaus (tai Cmd+⌥) lisää tai siirtää yksittäisiä pisteitä. Automationin ⌥+klikkaus kytkee Curve -tilan päälle — nappiin ilmestyy pieni täplä, ja kahden pisteen välistä vetämällä käyrä taipuu suoran sijaan (myös jo kaarevaa osaa voi taivuttaa uudelleen). Kun palaat pistetilaan, klikkaus lisää pisteen mihin tahansa — myös kaarelle, täsmälleen käyrän kohdalle — ja pistettä raahatessa viereiset kaaret seuraavat pehmeästi. Pisteen poisto (klikkaus) suoristaa sen viereiset kaaret.
Automation piirtää volume-automaation, ja efektien automaatio on omassa napissaan: FX Automation (työkaluvalikon FX-nappi) tuo aaltomuotoon FX Slotin MIX-kaistan tai valitsemasi plugarin parametrin kaistan. Vain valittu kaista piirtyy täydellä värillä pistekahvoineen, toinen himmenee taustalle. Kummankin napin oikea klikkaus valitsee Points- tai Curve-tilan.
4. Loop Match — saumaton looppi
Paina Loop Match — Loop kytkeytyy samalla päälle, joten erillistä työkalujen järjestystä ei tarvitse muistaa. Se hakee loopille parhaan saumakohdan ja tuo esiin sinisen lisärajaimen. Vetämällä lisärajainta ulospäin määrität, kuinka pitkältä matkalta valitun alueen edeltä sekoittuu ristihäivytyksenä alueen loppuun luoden saumattoman loopin.
Juuri siksi looppi on saumaton: häivytys päättyy siihen ääneen joka luonnostaan edeltää alueen alkua, joten kierroksen vaihtuessa jatko on täsmälleen se mitä tiedostossakin seuraisi. Tällöin esimerkiksi QLabiin raahatessa loopin saumattomuus on taattu lyhyemmilläkin klipeillä.
Sauman voi ottaa kummasta päästä tahansa: sauman liikkuvassa reunassa on sininen pallo, ja vastakkaisessa päässä odottaa toinen pallo — siitä vetämällä sauma vaihtaa suuntaa suoraan, ilman että nykyistä tarvitsee ensin purkaa. Alun pallosta aukeaa sauma alusta, lopun pallosta lopusta. Sauma piirtyy aina valitun alueen sisälle.
Jos ainesta ei ole — looppi koko raidalle tai tasamittainen bounce — SOUNDINDX tekee tilan itse: valinnan rajain väistyy sisään täsmälleen sauman verran sitä mukaa kun sinistä palloa vedetään, ja veto takaisin palauttaa sen. Koko raidan armaus tekee tämän valmiiksi lopusta (Match seam -asetus, prosentti valinnan mitasta), joten looppi alkaa tiedoston alusta ja on saumaton ensimmäisestä kierroksesta. Esikuuntelu soittaa täsmälleen samaa tiedostoa jonka vienti tuottaa, joten QLab kuulostaa samalta kuin SOUNDINDX.
Loop Match on yksi kokonaisuus: valinnan kehys kattaa myös lainatun aineksen, joka piirtyy samalla sinisellä ja samalla verhokäyrällä kuin saumavyöhyke — näin näet, että looppi ei ala tiedoston alusta vaan lainaa sieltä. Ristihäivytyksen muoto valitaan automaattisesti mitatun korrelaation mukaan: musiikissa tasatehoinen, tasaisessa ambienssissa tasajännitteinen, eikä sauma notkahda tai pullistu. Clip to Selection rajaa näkymän koko kokonaisuuteen pienellä marginaalilla, ja raidan rajaimet väistyvät kun Loop Match on päällä.
Seam FX: saumalle voi antaa oman efektiketjun. Kun Loop Match on päällä, FX-telakkaan ilmestyy SEAM-rivi — lisää sinne vaikka kaiku tai särö, ja se kuuluu vain sauman yli: nousee ristihäivytyksen aikana, kantaa loopin kierroksen vaihtumisen yli ja häipyy alun jälkeen. Raidan oma FX-ketju pysyy erillisenä; sauman ketjulla on oma MIX ja omat presetit, ja se tallentuu raidan kompositioon vain Save Compositionilla — tallentamaton ketju ei jää voimaan raitaa vaihdettaessa tai sovelluksen uudelleenkäynnistyksessä, ja Clear tyhjentää sen. Plugaria voi säätää loopin soidessa: muutos vaihtuu saumaan ilman katkoa. Loop Match -napin oikea klikkaus avaa telakan suoraan, ja ⌥+klikkaus soittaa sauman: soittopää hyppää pari sekuntia ennen ristihäivytystä ja looppi jatkuu sen yli, joten sauman kuulee heti ilman tähtäämistä.
5. Säätöpalkki — CYCLES · PITCH · GAIN · EQ · FX
Aaltomuodon yläpuolella on yhtenäinen säätöpalkki. Jokaisella työkalulla on oma lohko, jossa on power-nappi ja työkalun nimi: power kytkee työkalun päälle tai pois säätöjä menettämättä, ja koko lohko näyttää tilansa samalla tavalla kuin transportin napit. PITCH ja GAIN säädetään nimestä raahaamalla; EQ ja FX avaavat nimestä oman paneelin aaltomuodon alle — vain toinen on auki kerrallaan, EQ avautuu FX:n tilalle ja FX EQ:n. CYCLES-lohko näkyy kun Loop on päällä.
Palkin alussa on PITCH-merkki. Raahaa siitä pystysuunnassa: sävelkorkeus muuttuu puolisävelaskelin, ja ⌥ pohjassa hienosäädät sentteinä. Tuplaklikkaus palauttaa nollaan. Muutos kuuluu heti esikuuntelussa, tallentuu raidan kompositioon ja leipoutuu mukaan vietyihin klippeihin — QLab kuulostaa samalta kuin esikuuntelu. Kesto ei muutu, joten loopit pysyvät mitassaan.
Sen vieressä on GAIN-merkki. Klikkaus ehdottaa parhaan arvon: sovellus mittaa koko raidan huipun ja asettaa vahvistuksen, jolla huippu on tasan −1 dB — hiljainen raita nousee, liian kuuma laskee. Vaikutuksen näkee heti aaltomuodosta ja kuulee esikuuntelussa. Raahaamalla pystysuunnassa säädät vapaasti desibeleinä (⌥ hienosäätää), ja uusi klikkaus palauttaa nollaan. Vienti on aina turvallinen: viedyn tiedoston huippu ei koskaan ylitä −1 dB:tä, vaikka vahvistusta kääntäisi käsin yli tai efektiketju nostaisi signaalia — klippaus on mahdoton.
EQ-merkki avaa kanava-EQ:n aaltomuodon alle: kuusi suodinta — Lo-Cut, LOW, LOW-MID, HIGH-MID, HIGH ja Hi-Cut — palloina vastekäyrällä. Vedä palloa: vaakasuunta on taajuus, pystysuunta gain (±12 dB). Rulla pallon päällä säätää parametristen kaistojen Q:n, ⌥+klikkaus ohittaa kaistan (pallo jää ontoksi), tuplaklikkaus palauttaa sen oletukseen — Lo-Cutin ja Hi-Cutin tuplaklikkaus kytkee leikkurin päälle tai pois — ja tuplaklikkaus EQ-merkkiin nollaa kaiken. Lukema näkyy kuplana sen pallon vieressä jota liikutat, ja käyrän taustalla elää reaaliaikainen spektri. EQ kuuluu heti, tallentuu kompositioon ja leipoutuu vienteihin täsmälleen samana.
FX-merkki avaa FX-telakan samaan paikkaan: Audio Unit -plugarit ovat siinä chippeinä samalla kielellä kuin palkki — chipin power ohittaa plugarin, nimen klikkaus avaa sen oman editorin (ikkuna pysyy pinnalla kunnes suljet sen, mitoittuu plugarin kokoon ja vierittyy, jos plugari on näyttöä suurempi; välilyönti soittaa myös editorin ollessa edessä), × poistaa ja raahaus vaihtaa järjestyksen (järjestys on signaaliketjun järjestys). + listaa asennetut plugarit, Verified-merkityt ensin; plugarin lisäys kytkee FX:n päälle. Presets tallentaa ja palauttaa koko ketjun plugaritiloineen, ja presetit ovat yhteisiä kaikille raidoille — niillä siirrät suosikkiketjusi raidalta toiselle. MIX-lukemaa raahaamalla säädät kuivan ja märän suhteen; jos FX-automaatio on piirretty, lukema seuraa käyrää reaaliajassa ja veto siirtää koko käyrää. Telakassa on kaksi riviä samalla kaavalla: TRACK on raidan ketju ja SEAM Loop Matchin sauman oma ketju, kummallakin oma MIX ja omat presetit. Molemmat ketjut kuuluvat raitaan ja tallentuvat komposition mukana; uusi raita alkaa tyhjällä ketjulla. FX kytketään päälle lohkon power-napista — se soi esikuuntelussa ja leipoutuu vientiin.
6. Key Match — sovita sävellajiin
Työkalurivin ääniraudasta avautuu Key Match: se tunnistaa sävellajin ja ehdottaa pienimmän pitch-siirron, jolla ladattu ääni istuu siihen. Kohteen voi kuunnella kolmesta lähteestä: Mic (mikrofoni — esim. bändi harjoituksissa), System audio (mitä tahansa Macilla juuri soi — Spotify, Logic tai mikä vain; vaatii macOS 14.2:n ja luvan, jonka macOS kysyy ensimmäisellä kerralla) tai File… (referenssitiedosto, esim. esityksen musiikkiraita). Tunnistus päivittyy sekunnin välein ja näyttää varmuuden — sade tai narina ei ole missään sävellajissa, ja silloin se myös sanotaan suoraan.
Kun molemmat sävellajit ovat tiedossa, Apply to PITCH vie ehdotetun siirron suoraan PITCH-säätimeen — vienti leipoo sen mukaan kuten aina. Ääntä ei tallenneta eikä lähetetä mihinkään: analyysi tapahtuu tällä Macilla ja puskuri katoaa kun kuuntelu lopetetaan.
7. Vie ulos — yläpalkin kortista
Valmis klippi asuu Macin yläpalkissa: SOUNDINDXin kortti näyttää lähtevän klipin keston ja tyypin, ja sen logo elää soivan äänen mukana. Tartu korttiin ja raahaa se QLabiin, DAW:iin tai Finderiin — myös silloin kun SOUNDINDX ei ole päällimmäisenä, esimerkiksi QLab fullscreenissä. Kursorin mukana kulkee sama kortti. Rajaus, fadet, Loop Match -sauma, pitch, EQ ja FX-ketju (halutessasi häntineen) leivotaan tiedostoon; nimi kertoo mitä vietiin, esim. Sade — 12.2s–24.8s.wav tai Sade — loop ×3.wav (Settings › Export: vaihtoehtona pelkkä alkuperäinen nimi). Tiedostoon kirjoitetaan myös bext-kuvaus siitä, mistä ja miten klippi tehtiin. Painallus renderöi klipin valmiiksi (kortti sanoo hetken "Rendering…"), veto alkaa kun tiedosto on valmis. Kortin oikea klikkaus: FX tail päälle/pois, Fade in / Fade out composition (Off–10 s: häivytys koko lopputuloksen alkuun ja loppuun — kun Loop Cycles tuottaa viisi kierrosta, fade out tulee vasta viimeisen lopussa; tarkka arvo Settings › Export), viimeiset 5 klippiä (valitse, ja seuraava veto vie sen uudelleen ilman renderöintiä — harjoituksessa sama klippi tarvitaan usein uudestaan), kopiointi leikepöydälle, vientiasetukset ja SOUNDINDXin nosto esiin.
QLabissa pudotus cue-listaan luo Audio cuen (myös fullscreen-työtilassa); pudotus Finderiin tallentaa tiedoston. Mikä tahansa sovellus, joka ottaa vastaan äänitiedostoja pudottamalla, toimii samalla tavalla.
Sama kortti on tarjolla myös sovelluksen sisällä (Settings › Export), ikkunan oikeassa yläkulmassa — täsmälleen sama veto ja sama oikean klikin valikko, jos haluat pitää Macin yläpalkin vapaana. Sen voi lisäksi pudottaa sivupalkin kansioriviin tai auki olevaan listanäkymään, jolloin valmis klippi kopioituu siihen kansioon tai projektiin jota katselet.
Ääniraidan voi nimetä uudelleen hiiren oikealla: valitse Rename…, kirjoita uusi nimi (pääte säilyy automaattisesti) ja paina Enter. Raidan työ — rajaimet, loopit, fadet ja pitch — seuraa tiedostoa uudelle nimelle.
8. Sessiot ja projektit
Save Composition tallentaa raidan työn (alue, loopit, fadet, FX, kääntö) siihen raitaan. Ilman tallennusta työ katoaa raitaa vaihtaessa — tämä on tarkoituksellista, jotta selailu pysyy kevyenä. Clear Composition nollaa raidan; varmistus kysytään kaksoispainalluksella.
Jos SOUNDINDX sulkeutuu odottamatta kesken tallentamattoman työn, seuraava käynnistys tarjoaa sen takaisin: Restore avaa työtilan sellaisena kuin se oli, Discard heittää sen pois. Palautettu työtila ei ole vielä tallennettu tiedosto, joten Save kysyy kohteen. Siisti lopetus ei jätä palautusta jälkeensä — kysymys tulee vain aidon keskeytyksen jälkeen.
9. Soundstack — useita ääniä samalle aikajanalle
Avaa vasemman yläkulman pino-kuvakkeesta. Aaltomuoto vaihtuu pinon näkymäksi, ja tiedostotaulukkoon ilmestyy oma Stack-sarake: + lisää rivin äänen pinoon omaksi lohkokseen, sama nappi poistaa sen (kapeassa ikkunassa +/− istuu rivin oikeassa reunassa). Äänen voi myös raahata listalta suoraan pinoon haluamaansa kohtaan — ja vetolapun kautta pinoon voi pudottaa myös valmiin klipin, jolloin se renderöityy omaksi raidakseen. Lohkon voi järjestää uudelleen raahaamalla sen toisen kaistan päälle.
Paneelin yläreunassa kulkee aikajana. Klikkaus siirtää soittopään; tyhjällä kohdalla vetäminen maalaa kullanvärisen loop-alueen, jota Loop-napin ollessa päällä toisto kiertää — riippumatta siitä mitä pinossa on. Tuplaklikkaus aikajanaan poistaa alueen, ja alue säilyy myös sovelluksen uudelleenkäynnistyksen yli. Playn ⌥-tila ("Play from selected area") hyppää pinossa loop-alueen alkuun. Enter palauttaa soittopään alkuun.
Kunkin lohkon yläpuolisko maalaa tai muuttaa valinnan, aivan kuten normaalitilassa — veto voi jatkua usean lohkon yli, jolloin sama valinta osuu niihin kaikkiin (katkoviivakehys ilmestyy kun veto ulottuu toiselle raidalle, ja usean raidan valinnan jälkeen aikajanalle jää valkoinen kahvakaista, josta koko yhteisvalintaa voi liu'uttaa). Alapuolisko raahaa koko lohkon ajoituksen jaetulla aikajanalla. Kulmista vedetään fade auki, reunoista rajataan lohkon alku ja loppu. Lohkon voi aktivoida klikkaamalla (⇧-klikkaus lisää useampia, tyhjän kohdan klikkaus poistaa aktivoinnit, tyhjästä vetäminen aktivoi vedon alle jäävät) — aktivoiduilla raidoilla rajaimet ja fadet liikkuvat ryhmänä samalla vedolla. Tuplaklikkaus valintaan poistaa valinnan, tuplaklikkaus lohkon reunakahvaan palauttaa rajaukset täyteen mittaan. Cmd- ja Cmd+⌥-veto toimivat lohkolla kuten normaalitilan Track Volume / Automation.
Select All valitsee ja aktivoi kaikki lohkot kokonaan (nappi muuttuu Select None -napiksi, joka tyhjentää valinnat) — sen jälkeen alapuoliskon raahaus siirtää koko pinoa ja Clip to Selection rajaa jokaisen valitun kerralla. Kaksi ajallisesti limittyvää lohkoa saavat saumaansa ristihäivytysnapin (kaksi ristikkäistä ramppia) — se lisää crossfaden niiden väliin, ja crossfaden pituutta säädetään lohkojen kulmakahvoista. Lohkon päällä on sen työkalurivi: raidan nimi värimerkillä, M (mute) ja S (solo), gain desibeleinä sekä pan (pystyveto kääntää, tuplaklikkaus keskittää). Rivi on levossa näkymätön eikä peitä ääntä — se ilmestyy osoittaessa ja jää näkyviin kun jokin tila poikkeaa oletuksesta. Lohkon siirto nappaa toisten lohkojen alkuihin ja loppuihin, loop-alueen reunoihin ja soittopäähän; nuolinäppäimet hienosiirtävät aktivoituja lohkoja 10 ms (⇧: 100 ms). Fit palauttaa koko pinon näkyviin ja zoom-lukema kertoo suurennuksen. Kahden sormen pystyvieritys liikkuu kaistalistassa, vaakavieritys panoroi aikajanaa ja ⌥+rulla zoomaa.
Play, Stop ja Export yläpalkissa ohjaavat pinoa aina kun paneeli on viimeksi klikattu kohde — fokus siirtyy takaisin yksittäiseen tiedostoon heti kun klikkaat kirjastoriviä, eikä pino sulkeudu siitä. Save Stack ei avaa tallennusikkunaa: se avaa sivupalkkiin kehotteen nimikenttineen (oletusnimi valmiina), ja seuraava klikkaus sivupalkissa valitsee sijainnin. Soundstacks-osioon tallentuu muokattava asettelu, jonka klikkaus avaa takaisin pinoon työstettäväksi; Sounds- tai Projects-kansioon tallentuu valmiiksi renderöity äänitiedosto (FORMAT-sarakkeessa "STACK"). Soundstacks-osioon voi luoda kansioita, ja ✕ siirtää tallenteen roskakoriin. Clear Stack tyhjentää pinon; varmistus kysytään kaksoispainalluksella.
Asetukset, jotka kannattaa tietää
- Click protection — napsahduksenesto kolmessa kohdassa: Loop ja Loop Match 0–20 ms; Transport (pysäytys, playhead-hypyt, rajainsiirrot) 0–200 ms, oletus 128 ms — lyhyempi ei ehdi äänipolun läpi.
- Match seam — Loop Matchin oletussauma prosentteina valinnan mitasta (0 = pois).
- Quick loop — alueen maalaaminen aloittaa loopin heti.
- Menu bar — yläpalkin export-kortti: vedä nykyinen lopputulos mihin tahansa sovellukseen, myös kun SOUNDINDX ei ole päällimmäisenä (esim. QLab fullscreenissä). Kortista vedettäessä kursorin mukana kulkee sama kortti. Sovelluksen sisäinen export-kortti on oletuksena piilossa — sen saa näkyviin Settings › Export.
- Keep tools active across tracks — Loop, Loop Match, Reverse Loop ja Loop Cycles säilyvät raitoja selatessa; Loop Match armaa uuden raidan oletussaumalla näkyvästi.
- FX — Audio Unit -ketju hallitaan FX-telakassa (säätöpalkin FX-merkki): plugarit, järjestys, ohitus, presetit ja MIX. Ketju on raitakohtainen ja Save Composition tallentaa sen raidan mukaan; presetit ovat yhteisiä. Settings › FX:ssä on vain plugarien skannaus. Listassa Verified-merkityt pluginit (Applen omat ja testatut kolmannen osapuolen) tulevat ensin — ne ovat tuettuja, muut toimivat yleensä mutta ovat tuen ulkopuolella.
- Edit Description — rivin oikean napin valikosta (tai Get Infon Description-riviltä). WAV-tiedostoon kuvaus kirjoitetaan tiedoston sisään (BWF bext), muihin formaatteihin kirjastoon; haku löytää sen heti.
- Settings-ikkuna on jaettu sivuihin: General, Library, Controls, Playback, FX, Export, License — jokaisella asetuksella on lyhyt selite.
- Export › Format — 24-bit PCM (oletus, QLabin ja DAW:ien arki) tai 32-bit float; näytetaajuus lähteen mukaan tai kiinteä 48/44.1/96 kHz. File names: "Nimi — 12.2s–24.8s" / "Nimi — loop ×3" tai pelkkä alkuperäinen nimi.
- General › Tips — kertavihjeet ensimmäisellä käytöllä sekä Tip-ruutu sivupalkin alakulmassa: osoita mitä tahansa työkalua, ja ruutu kertoo mitä se tekee. Tip box -kytkin samassa paikassa; tämä asetus sammuttaa kaikki vihjeet.
- Audio — näyttää laitteen näytetaajuuden ja kertoo, jos kirjaston yleisin taajuus poikkeaa.
Toiminnot ja napit
Jokainen rivi vastaa sovelluksen todellista painiketta. Näppäimet ovat oletuksia — kaikki ovat opetettavissa uudelleen tai poistettavissa asetuksista, ja jokaiselle napille voi opettaa myös MIDI-nuotin: klikkaa napin MIDI-solua Controls-rivillä ja paina nuottia laitteestasi. Nopein reitti on kuitenkin suoraan napista: klikkaa mitä tahansa ohjainnappia hiiren oikealla ja valitse MIDI Learn — nappi sykkii kunnes painat nuottia, ja sama valikko näyttää opitun nuotin ja poistaa mappauksen.
Soitto ja selaus
| Play | Väli | Soittaa valitun äänen. ⌥+klikkaus vaihtaa soitetaanko soittopäästä vai valitusta alueesta — sama valinta löytyy myös napin oikean klikkauksen valikosta. | |
| Stop | ⇧+S | Pysäyttää toiston. | |
| Listan selaus | ↑↓ | Siirtyy ääniraitalistassa edelliseen tai seuraavaan ääneen. | |
| Previous | — | Siirtyy edelliseen ääneen tai valinnan reunaan — kumpaan, sen valitset ⌥+klikkauksella tai napin oikealla klikkauksella. Ei oletusnäppäintä — opetettavissa. | |
| Next | — | Siirtyy seuraavaan ääneen tai valinnan reunaan — sama ⌥-valinta kuin Previousissa. Ei oletusnäppäintä — opetettavissa. | |
| Shuffle | ⇧+X | Arpoo satunnaisen äänen kirjastosta. | |
| Auto-play | — | Kytkettynä valittu ääni soi heti — selaa listaa ja kuulet jokaisen. | |
| Volume | ↑↓←→ | Raahaa tai rullaa säädintä; tuplaklikkaus palauttaa 100 %. Nuolet hienosäätävät kun säädin on aktiivinen. |
Loop-työkalut
| Loop | ⇧+L | Toistaa valinnan saumattomana silmukkana. ⌥+klikkaus kytkee Quick Loopin (maalaus aloittaa loopin heti) — sama valinta myös napin oikeasta klikkauksesta. | |
| Loop Cycles | ⇧+V | Valinta soi N kertaa ja pysähtyy. Kierrosluku CYCLES-merkistä raahaamalla; vienti renderöi tasan N kierrosta, Fade in/out koko klipin alkuun ja loppuun. | |
| Loop Match | ⇧+Z | Etsii puhtaimman loop-sauman automaattisesti sekä asettaa lisärajaimen, jonka avulla voit häivyttää loopin saumaa. Sauman voi ottaa kummasta päästä tahansa vetämällä, ja tarvittaessa SOUNDINDX tekee tilan siirtämällä valinnan rajainta. | |
| Reverse Loop | ⇧+R | Alue soi edestakaisin (ping-pong). |
Muokkaus ja kompositio
| Reverse | ⌃+R | Kääntää valinnan takaperin — tai koko raidan, jos mitään ei ole valittuna. | |
| Show only selected | ⇧+T | Rajaa aaltomuodon näyttämään vain valitun alueen. | |
| Track Volume | — | Raahaus (tai Cmd) siirtää koko volyymikäyrän kerralla ylös tai alas. | |
| Volume Automation | — | Volume-automaatio: raahaus viivasta lisää pisteen ja siirtää sitä (myös Cmd+⌥). Oikea klikkaus tai ⌥+klikkaus valitsee Points / Curve (täplä nappiin): Curve-tilassa pisteiden välistä vetämällä käyrä taipuu. | |
| Save Composition | ⇧+C | Tallentaa raidan muokkaukset kompositioksi. | |
| Clear Composition | ⌫ | Palauttaa raidan oletustilaan ja poistaa muokkaukset. | |
| Undo | ⌘+Z | Kumoaa viimeisimmän muokkauksen. | |
| Redo | ⌘+⇧+Z | Palauttaa kumotun muokkauksen. | |
| Split View | ⇧+B | Jakaa näkymän useampaan lohkoon. Voit lisätä Split View -näkymään useampia hakemistoja rinnakkain. | |
| Add to Split View | — | Kirjaston rivin nappi: tuo kyseisen kansion tai projektin Split View -näkymään muiden rinnalle. |
FX
| FX (säätöpalkki) | ⇧+I | Säätöpalkin FX-lohko: power kytkee efektiketjun päälle (täysille, insert-tyyppisesti), nimi avaa FX-telakan aaltomuodon alle — TRACK- ja SEAM-rivit, plugarit, presetit ja MIX. Telakka ja EQ vuorottelevat samassa paikassa. | |
| FX Automation | ⇧+F | Tuo automaatiokaistan aaltomuotoon. Oletuskaista on FX Slot MIX (turkoosi viiva): raahaus viivasta lisää pisteen ja siirtää sitä. Oikea klikkaus listaa raidan ketjun plugarit ja niiden automatisoitavat parametrit suoraan plugarista — valitse parametri, niin se saa oman oranssin kaistan, jonka lukema näyttää arvon yksiköineen. Useita parametreja voi automatisoida rinnakkain; ⌥+oikea klikkaus poistaa kaistan. Samasta valikosta Points / Curve. Piirtää voi myös FX pois päältä — lukema kertoo "FX off". Nappi ei kytke efektiä; sen tekee FX-lohkon power. Käyrät tallentuvat kompositioon ja renderöityvät vientiin näytetarkasti. | |
| Include FX tail | — | Efektin häntä, esimerkiksi kaiun jälkisointi, tulee mukaan vietyyn klippiin. Oletuksena päällä — vienti kuulostaa samalta kuin esikuuntelu; kytke pois kun haluat kuivan leikkauksen. | |
| Järjestys (raahaus) | — | FX-telakassa plugarin järjestys vaihdetaan raahaamalla chippiä. Järjestys ratkaisee missä järjestyksessä efektit ajetaan. |
Vienti ja raahaus
| Export Composition | — | Vie koko komposition äänitiedostoksi. | |
| Export Selection | — | Vie pelkän valitun alueen. | |
| Drag out | — | Raahaa valmis klippi suoraan toiseen sovellukseen — esimerkiksi QLabin cue-listaan tai Finderiin. Loopiksi merkitty klippi pysyy saumattomana myös raahattuna. |
Soundstack
| Soundstack | — | Avaa tai sulkee pinonäkymän, joka korvaa aaltomuodon. Tiedostotaulukon Stack-sarake lisää (+) ja poistaa ääniä pinosta. | |
| Select All / Select None | — | Valitsee ja aktivoi jokaisen lohkon kokonaan — käytä sitten ryhmäsiirtoon tai Clip to Selectionan. Kaikkien ollessa valittuina sama nappi tyhjentää valinnat. | |
| Crossfade seam | — | Ilmestyy kahden ajallisesti limittyvän lohkon saumaan — lisää ristihäivytyksen niiden väliin. | |
| Jaettu soittopää | — | Koko paneelin korkuinen viiva. Raahaa sitä tai klikkaa tyhjää tilaa siirtääksesi sen kohdan. Enter palauttaa alkuun. | |
| Aikajana | — | Paneelin yläreunassa. Klikkaus siirtää soittopään; veto tyhjällä kohdalla maalaa loop-alueen, jota Loop kiertää pinon sisällöstä riippumatta. Tuplaklikkaus poistaa alueen. Usean raidan valinnan valkoisesta kaistasta koko yhteisvalintaa voi liu'uttaa. | |
| Save Stack | — | Ei tallennusikkunaa: sivupalkkiin ilmestyy nimikehote, ja seuraava klikkaus valitsee sijainnin — Soundstacks-osioon muokattava asettelu, Sounds/Projects-kansioon renderöity tiedosto (FORMAT "STACK"). Esc tai toinen painallus peruu. | |
| Soundstacks-osio | — | Sivupalkin kolmas osio tallennetuille pinoille. Klikkaus avaa asettelun takaisin muokattavaksi, + Add Folder luo kansion, ✕ siirtää roskakoriin (varmistus toisella painalluksella). | |
| Clear Stack | — | Tyhjentää pinon; varmistus kysytään kaksoispainalluksella. |
Kirjasto ja projektit
| Show in Finder | — | Avaa kansion tai projektin Finderissa. | |
| New subfolder | — | Luo uuden alikansion projektin sisään. | |
| Remove | — | Poistaa kansion kirjastosta tai projektin listalta — vain listalta, tiedostot säilyvät levyllä. | |
| Liitä tiedostot | ⌘+V | Liittää leikepöydän äänitiedostot aktiiviseen projektiin tai kansioon. |
Näppäimistö
| Valinnan alku | I | Siirtää valinnan alun soittopään kohtaan. | |
| Valinnan loppu | O | Siirtää valinnan lopun soittopään kohtaan. | |
| Haku | ⌘+F | Fokusoi hakukentän mistä tahansa. Esc tyhjentää haun. | |
| Lisää kansio | ⇧⌘+O | Sama kuin sivupalkin + Add Folder. |
Asetukset ⚙
| Appearance | — | Teema — Booth on syvin musta pimeään tarkkaamoon (oletus), Studio neutraali tumma päivätyöhön ja Daylight vaalea — sekä listatekstin koko (S/M/L). Theme control in the top bar tuo kolme teemanappia yläpalkkiin Volume-nupin viereen. Sidebar-välilehdeltä valitaan mitkä sivupalkin osiot ovat näkyvissä. | |
| Controls | — | Ohjauspaneelin nappien näkyvyys ja järjestys. Reset to default order palauttaa oletusjärjestyksen. | |
| Pikanäppäimet | — | Klikkaa toimintoa ja paina uusi näppäin. Tyhjennys poistaa näppäimen kokonaan — se on eri asia kuin oletuksen palautus. | |
| FX-telakka | — | Plugin-ketjua hallitaan FX-telakassa (säätöpalkin FX-merkki). Rescan etsii asennetut Audio Unit -pluginit uudelleen. Tuki kattaa Verified-merkityt pluginit, jotka ovat läpäisseet SOUNDINDXin testiprotokollan — tällä hetkellä Applen omat AU-efektit; kolmannen osapuolen plugineja (mm. Waves) lisätään listalle sitä mukaa kun ne on testattu. Muut toimivat yleensä mutta ovat tuen ulkopuolella. | |
| Lisenssi | — | Activate avaa sovelluksen lisenssiavaimella. Deactivate this Mac vapauttaa paikan toiselle koneelle. Testaajan avain (alkaa RMK-TRIAL) jatkaa kokeilua avaimen päivämäärään asti ilman verkkoa. |
Nuolinäppäimet on varattu ääniraitalistan selaamiseen, eikä niitä voi opettaa muille toiminnoille — sama näppäin tarkoittaisi silloin kahta asiaa. Kaikki muut ovat vapaasti vaihdettavissa.
Library browser, transport and waveform — all in one window.
Five minutes — the whole workflow
- Add a folder (+ Add Folder or ⇧⌘O). Files stay where they are; nothing is copied.
- Search and audition: type in the search field, arrow keys move through the list, Space plays.
- Paint a selection on the waveform (or press I and O at the playhead). Loop on; Loop Match makes the seam seamless.
- Drag the card from the menu bar into QLab — fullscreen included. The file is ready the moment the card starts moving.
1. Add your library
Press + Add Folder in the left sidebar and pick the folder holding your sounds. The scan walks subfolders and reads metadata in the background, so you can start browsing straight away. Add as many folders as you like; All Files shows them as one list.
The chevron on a folder row opens its subfolders as a tree — clicking one narrows the list to that folder, and search, shuffle and pasting all work within it. The library and projects also follow Finder in real time: a file added, removed or moved on disk shows up in the list by itself within a couple of seconds, no rescan needed.
You can also drag audio files from the Finder straight into SOUNDINDX: drop them on a PROJECTS or SOUNDS folder row, or anywhere on the open file list to copy them into the folder you are viewing. Drones bounced in Logic land directly in the play's project folder with no steps in between.
The sidebar bends to your workflow: sections (SOUNDS, PROJECTS) collapse and expand from the chevron in their title, giving the freed space to the other sections, and subfolders collapse from the triangle on the folder row. Drag the sidebar's right edge to resize its width. Settings → Sidebar chooses which sections are visible at all.
2. Search and audition
Type in the search field — the list filters as you type. Arrow keys move through it and play each file automatically when Auto-play is on. Columns can be reordered and hidden in Settings.
The filter buttons in the column headers narrow the list by format, duration, sample rate and size. Filtering runs in the database, so it stays fast even in a library of hundreds of thousands of files.
You can select several files at once: ⇧-click selects a range, ⌘-click adds or removes individual rows. Drag the selection straight into Finder or another application, press Cmd+C to copy the files to the clipboard, or use Move to Trash in the row menu to send the whole selection to the Trash in one go. A multi-file drag moves the original files as they are — FX, fades and pitch apply only to the loaded track.
The sidebar's Duplicates row narrows the list to files the library holds more than one copy of (same name and size), and duplicate rows carry a ⧉ badge. Together with range selection, cleanup takes moments: narrow, select, Trash.
Get Info shows the file's peak and RMS level in decibels. The analysis runs in the background, so even a long file never blocks the interface.
You can also type directly in the list: letters jump to the matching name ("ra" lands on Rain), just like in Finder. / and ⌘+F move to the search field, which also searches the descriptions embedded in the files. Tool shortcuts are ⇧ combinations, so typing never fires a tool.
3. Frame the part you want
Right at the edges of the track sit its own start/end trim handles — accent-coloured grips that bound the track's whole usable length and affect both playback and export. Mid-drag the full file briefly reappears so you can pull a handle back into material it had cropped away; releasing collapses the view back to the trimmed range. Inside those handles you paint an ordinary selection by dragging across the waveform — that's what Loop, Loop Cycles, Reverse Loop and the rest below act on. The selected range stands out: it gets a frame and everything outside it dims. Grab either kind of handle by its ball, and double-clicking a selection handle sends it to the start or the end of the track.
The top corner is where a fade is pulled open. A fade always follows the start/end trim handle, even when it's dragged afterwards — a plain selection never affects a fade, and painting one over an existing fade never merges the two.
- Loop — circles the region, or the whole track if there is none. The plain Loop plays exactly the selected sound with no fades or seam — the preview sounds the same as the export.
- Loop Cycles — plays the selection N times, then stops. The cycle count is the CYCLES chip next to PITCH/GAIN (default 2): drag up/down or scroll, double-click resets to 2. Export renders exactly N cycles as one file, and Fade in / Fade out composition (right-click the export card) fades the start and end of the whole result — ten cycles of rain that starts and ends softly, ready for QLab.
- Smart Snap (magnet) — in transient mode the track's hits are drawn on the waveform as a transient grid, and dragging the selection or the edge handles snaps from marker to marker. Set the grid density with GRID in the control bar: the value is in dB below the loudest hit (e.g. −26), and a higher value keeps only the hardest hits such as kick and snare. The selection handles follow the setting straight away. GRID's power is the same switch as the magnet; ⌥-drag moves a handle freely, and switching the magnet off leaves the handles where they snapped. The right-click menu picks the mode (transients / zero crossings) and the Hard / Medium / Soft presets.
- Reverse Loop — plays the region back and forth. Loop Match works here too: the turnaround is crossfaded with the audio beyond the boundary, and the blue handle sets its length.
- Reverse — turns the material around; region or whole track.
- Show only selected area — turns the selection into the new start/end trim (same as Clip to Selection). The clipped region is immediately loopable: you can switch Loop on after clipping, too.
Track Volume and Automation draw volume over time. Dragging (or holding Cmd) shifts the whole finished curve up or down at once; dragging (or holding Cmd+⌥) adds or moves individual points. ⌥-clicking Automation toggles Curve mode on — a small dot appears on the button — after which dragging between two points bows the curve instead of drawing a straight line (an existing bow can be re-bent the same way). Back in point mode, a click adds a point anywhere — on a bow too, exactly on the curve — and as you drag a point the bows next to it follow smoothly. Removing a point (click) straightens the bows on either side.
Automation draws volume automation; effect automation has its own button: FX Automation (the FX button in the tool grid) brings the FX Slot MIX lane, or the lane of any plugin parameter you pick, onto the waveform. Only the chosen lane is drawn in full colour with its point handles, the other dims into the background. Right-click either button for Points or Curve.
4. Loop Match — a seamless loop
Press Loop Match — Loop switches on with it, so there is no tool order to remember. It finds the best seam for the loop and brings out a blue seam handle. Dragging the handle outward sets how much material before the selected region is crossfaded into the region's end, creating a seamless loop.
That is what makes the loop seamless: the crossfade ends on the audio that naturally precedes the region's start, so when the lap turns over, what follows is exactly what the file itself would have played. That is why, when you drag a clip out to QLab, the loop stays seamless even on shorter clips.
The seam can borrow from either end: the seam's moving edge carries a blue handle, and a second handle waits at the opposite end — drag it and the seam switches sides directly, no need to undo the current one first. The start handle opens a seam from the start, the end handle from the end, and the seam always draws inside the selected area.
When there is no material — a whole-track loop, or a bounce cut exactly to length — SOUNDINDX makes room by itself: the selection edge steps inward by exactly the seam length as you drag the blue handle, and dragging back returns it. Arming on a whole track does this for you from the end (the Match seam setting, a percentage of the selection), so the loop starts from the very beginning of the file and is seamless from the first lap. The preview plays exactly the same file the export produces, so QLab sounds identical to SOUNDINDX.
Loop Match is one unit: the selection frame also spans the borrowed material, drawn in the same blue and with the same envelope as the seam zone — so you can see the loop does not start at the file's beginning but borrows from it. The crossfade shape is chosen automatically from the measured correlation: equal-power for music, constant-voltage for steady ambience, so the seam neither dips nor bulges. Clip to Selection frames the whole unit with a small margin, and the track trims step aside while Loop Match is on.
Seam FX: the seam can carry its own effect chain. With Loop Match on, a SEAM row appears in the FX dock — add a reverb or distortion there and it is heard only across the seam: it rises over the crossfade, carries across the loop point and fades out after the start. The track's own FX chain stays separate; the seam chain has its own MIX and presets and is saved with the track's composition only when you press Save Composition — an unsaved chain does not survive a track change or a restart, and Clear empties it. You can adjust a plugin while the loop plays: the change reaches the seam without a dropout. Right-click the Loop Match button to open the dock directly, and ⌥-click it to play the seam: the playhead jumps a couple of seconds before the crossfade and the loop carries on across it, so you hear the seam at once without aiming.
5. The control bar — CYCLES · PITCH · GAIN · EQ · FX
Above the waveform sits one unified control bar. Every tool has its own block with a power button and the tool's name: power switches the tool on or off without losing its settings, and the whole block shows its state the same way the transport buttons do. PITCH and GAIN are set by dragging the name; EQ and FX open their own panel beneath the waveform from the name — only one is open at a time, EQ takes FX's place and FX takes EQ's. The CYCLES block appears when Loop is on.
First in the bar sits the PITCH chip. Drag it vertically to shift pitch in semitones; hold ⌥ to fine-tune in cents. Double-click resets to zero. The change is audible immediately in preview, is stored with the track's composition, and is baked into exported clips — QLab sounds the same as the preview. Duration is unchanged, so loops keep their length.
Beside it sits the GAIN chip. A click suggests the best value: the app measures the track's peak and sets the gain that lands it exactly at −1 dB — quiet tracks come up, hot tracks come down. You see the effect instantly in the waveform and hear it in preview. Drag vertically to adjust freely in decibels (⌥ fine-tunes); click again to reset. Exports are always safe: the exported file's peak never exceeds −1 dB, even if you push the gain past it by hand or the FX chain raises the signal — clipping is impossible.
The EQ chip opens a channel EQ beneath the waveform: six filters — Lo-Cut, LOW, LOW-MID, HIGH-MID, HIGH and Hi-Cut — as balls on the response curve. Drag a ball: horizontal is frequency, vertical is gain (±12 dB). Scroll on a ball to set Q on the parametric bands, ⌥-click to bypass a band (the ball goes hollow), double-click to reset it — on Lo-Cut and Hi-Cut a double-click switches the cut on or off — and double-click the EQ chip to reset everything. The readout appears as a bubble next to the ball you are moving, and a live spectrum breathes behind the curve. The EQ is heard immediately, stored with the composition and baked into exports exactly as you hear it.
The FX chip opens the FX dock in the same place: Audio Unit plugins sit there as chips in the bar's own language — the chip's power bypasses the plugin, clicking the name opens its editor (the window stays on top until you close it, sizes itself to the plugin and scrolls if the plugin is larger than the screen; Space plays even while the editor is in front), × removes it and dragging reorders (the order is the signal chain). + lists the installed plugins, Verified ones first; adding a plugin switches FX on. Presets saves and recalls the whole chain with its plugin states, and presets are shared by every track — that is how you carry a favourite chain from one track to another. Drag the MIX readout to set the dry/wet balance; with FX automation drawn, the readout follows the curve in real time and the drag moves the whole curve. The dock has two rows on one pattern: TRACK is the track's chain and SEAM the Loop Match seam's own chain, each with its own MIX and presets. Both chains belong to the track and are saved with the composition; a new track starts with an empty chain. Switch FX on with the block's power — it plays in preview and is baked into exports.
6. Key Match — fit the key
The tuning fork in the toolbar opens Key Match: it detects a musical key and suggests the smallest pitch shift that fits the loaded sound to it. Listen from three sources: Mic (e.g. the band in rehearsal), System audio (whatever this Mac is playing — Spotify, Logic, anything; requires macOS 14.2 and a one-time permission macOS asks for) or File… (a reference file such as the show's music track). Detection updates every second and shows its confidence — rain or a door creak is in no key at all, and Key Match says so instead of guessing.
Once both keys are known, Apply to PITCH sends the suggested shift straight to the PITCH control — exports bake it in as always. Audio is analyzed on this Mac only, never recorded or sent anywhere, and the buffer is discarded when you stop listening.
7. Drag it out — from the menu bar
The finished clip lives in the Mac menu bar: SOUNDINDX's card shows the length and kind of the clip you are about to send, and its logo moves with the sound that is playing. Grab the card and drag it into QLab, your DAW or the Finder — even when SOUNDINDX is not frontmost, QLab in fullscreen included. The same card travels with the cursor. Trims, fades, the Loop Match seam, pitch, EQ and the FX chain (with its tail if you want) are baked into the file; the name says what was exported, e.g. Rain — 12.2s–24.8s.wav or Rain — loop ×3.wav (Settings › Export can keep just the original name). A bext description of where the clip came from and what was done to it is written into the file. Pressing the card renders the clip (it says "Rendering…" for a moment) and the drag starts as soon as the file is ready. Right-click the card for FX tail on/off, Fade in / Fade out composition (Off–10 s: a fade on the start and end of the whole result — with five Loop Cycles the fade-out comes only at the end of the last one; exact value in Settings › Export), the last 5 clips (pick one and the next drag carries it again with no re-render — in tech the same clip is needed twice more often than not), copying the clip to the clipboard, export settings and bringing SOUNDINDX to the front.
In QLab a drop on the cue list creates an Audio cue (fullscreen workspace included); a drop in Finder saves the file. Any app that accepts dropped audio files works the same way.
The same card is also available inside the app (Settings › Export), in the window's top-right corner — exactly the same drag and the same right-click menu, if you'd rather keep the Mac menu bar free. It can additionally be dropped onto a sidebar folder row or straight onto the open file list, and the finished clip is copied into the folder or project you are viewing.
Tracks can be renamed from the right-click menu: choose Rename…, type the new name (the extension is kept automatically) and press Enter. The track's work — markers, loops, fades and pitch — follows the file to its new name.
8. Compositions and projects
Save Composition stores a track's work — region, loops, fades, FX, reversal — with that track. Without saving, the work is gone when you change tracks; that is deliberate, so browsing stays weightless. Clear Composition resets the track and asks for confirmation with a second press.
If SOUNDINDX closes unexpectedly while you have unsaved work, the next launch offers it back: Restore reopens the workspace as it was, Discard throws it away. A restored workspace is not a saved file yet, so Save asks where to put it. A clean quit leaves no snapshot behind — the question only appears after a genuine interruption.
9. Soundstack — several sounds on one shared timeline
Open it from the stack icon in the top-left corner. The waveform switches to the stack view, and the file table gains its own Stack column: + adds that row's sound to the stack as its own block, the same button removes it (in a narrow window the +/− sits at the row's right edge). You can also drag a sound from the list straight into the stack at the spot you want — and dropping the drag chip into the stack renders the finished clip as its own track. Reorder a block by dragging it onto another lane.
A timeline runs along the top of the panel. Clicking it moves the playhead; dragging on an empty stretch paints a golden loop region that playback cycles through while Loop is on — regardless of what is in the stack. Double-clicking the timeline removes the region, and the region survives app restarts. Play's ⌥ mode ("Play from selected area") jumps to the loop region's start in the stack. Enter returns the playhead to the beginning.
Each block's top half paints or adjusts a selection, exactly as in normal mode — the drag can continue across several blocks, giving them all the same selection (a dashed frame appears once the drag reaches a second track, and after a multi-track selection the timeline keeps a white handle band you can slide to move the whole shared selection). The bottom half drags the block's timing along the shared timeline. Corners open a fade, edges trim the block's start and end. A block can be activated by clicking it (⇧-click adds more, clicking empty space clears activations, dragging from empty space activates the blocks under the drag) — on activated tracks the trim handles and fades move as a group with one drag. Double-clicking a selection removes it; double-clicking a block's edge handle resets the trims to full length. Cmd- and Cmd+⌥-drag work on a block the same way Track Volume / Automation do in normal mode.
Select All selects and activates every block in full (the button turns into Select None, which clears them) — after that, dragging any lower half moves the whole stack and Clip to Selection trims every selected block at once. Two blocks that overlap in time get a crossfade button at their seam (two crossing ramps) — it adds a crossfade between them, and the crossfade length is adjusted from the blocks' corner handles. Each block carries its tool row: the track name with a color mark, M (mute) and S (solo), gain in decibels, and pan (drag vertically, double-click to center). The row is invisible at rest and never covers the audio — it appears on hover and stays visible whenever a state differs from the default. Moving a block snaps to other blocks' starts and ends, the loop region edges and the playhead; arrow keys nudge the activated blocks by 10 ms (⇧: 100 ms). Fit brings the whole stack back into view, and the zoom readout shows the magnification. Two-finger vertical scrolling moves through the lane list, horizontal scrolling pans the timeline, and ⌥+wheel zooms.
Play, Stop and Export in the top bar always control the stack while the panel was the last thing you clicked — focus moves back to a single file the moment you click a library row, and the stack does not close because of it. Save Stack opens no save dialog: a prompt with a name field (default name prefilled) appears in the sidebar, and your next click in the sidebar picks the location. Saving into the Soundstacks section stores an editable arrangement — clicking it there reopens it in the stack for further work; saving into a Sounds or Projects folder writes a rendered audio file (FORMAT column shows "STACK"). The Soundstacks section takes folders, and ✕ moves an entry to the Trash. Clear Stack empties the stack; confirmation is asked with a second press.
Settings worth knowing
- Click protection — three separate places: Loop and Loop Match 0–20 ms; Transport (stop, playhead jumps, handle moves) 0–200 ms, default 128 ms — shorter can't clear the audio path.
- Match seam — Loop Match's default seam as a percentage of the selection (0 = off).
- Quick loop — painting a region starts looping immediately.
- Menu bar — a drag-export card in the macOS menu bar: drag the current result into any app, even when SOUNDINDX isn't frontmost (QLab in fullscreen, for instance). While dragging, the same card travels with the cursor. The in-app export card is hidden by default — turn it on in Settings › Export.
- Keep tools active across tracks — Loop, Loop Match, Reverse Loop and Loop Cycles stay on while browsing; Loop Match arms each new track with the default seam, visibly.
- FX — the Audio Unit chain is managed in the FX dock (the FX chip in the control bar): plugins, order, bypass, presets and MIX. The chain belongs to the track and Save Composition stores it with the track; presets are shared. Settings › FX only holds the plugin scan. In the plugin list, Verified plugins (Apple's built-in and tested third-party) come first — those are supported; others usually work but are outside support.
- Edit Description — from the row's right-click menu (or the Description line in Get Info). WAV files get the description written inside the file (BWF bext); other formats keep it in the library. Search finds it immediately.
- Settings is organised into pages: General, Library, Controls, Playback, FX, Export, License — every setting has a short explanation.
- Export › Format — 24-bit PCM (default, what QLab and DAWs expect) or 32-bit float; sample rate as source or fixed 48/44.1/96 kHz. File names: "Name — 12.2s–24.8s" / "Name — loop ×3" or just the original name.
- General › Tips — one-time hints on first use, plus the Tip box in the sidebar corner: point at any tool and it tells you what it does. The Tip box switch next to it toggles the box; this setting turns all tips off.
- Audio — shows the device sample rate and tells you if most of your library runs at a different one.
Controls and buttons
Every row matches a real button in the app. The keys are defaults — all of them can be reassigned or cleared in settings, and every button can learn a MIDI note too: click the button's MIDI cell on the Controls row and play a note from your device. The fastest route is on the button itself: right-click any transport button and choose MIDI Learn — the button pulses until you play a note, and the same menu shows the learned note and removes the mapping.
Playback and browsing
| Play | Space | Plays the selected sound. ⌥+click toggles between playing from the playhead and from the selection — the same choice is in the button's right-click menu. | |
| Stop | ⇧+S | Stops playback. | |
| Browsing the list | ↑↓ | Moves to the previous or next sound in the track list. | |
| Previous | — | Moves to the previous sound, or the previous selection edge — pick which with ⌥+click or the button's right-click menu. No default key — assignable. | |
| Next | — | Moves to the next sound, or the next selection edge — the same ⌥ choice as Previous. No default key — assignable. | |
| Shuffle | ⇧+X | Picks a random sound from the library. | |
| Auto-play | — | When on, the selected sound plays at once — browse the list and hear every one. | |
| Volume | ↑↓←→ | Drag or scroll the control; double-click returns it to 100 %. Arrows fine-tune while it has focus. |
Loop tools
| Loop | ⇧+L | Repeats the selection as a seamless loop. ⌥+click toggles Quick Loop (painting a selection starts looping right away) — same choice in the button's right-click menu. In Soundstack, Loop repeats the whole stack from the start. | |
| Loop Cycles | ⇧+V | The selection plays N times, then stops. Cycle count by dragging the CYCLES chip; export renders exactly N cycles, with Fade in/out on the start and end of the whole clip. | |
| Loop Match | ⇧+Z | Finds the cleanest loop seam automatically and adds a second handle for fading the seam. The seam can borrow from either end by dragging, and SOUNDINDX makes room by moving the selection edge when needed. | |
| Reverse Loop | ⇧+R | The region plays back and forth (ping-pong). |
Editing and compositions
| Reverse | ⌃+R | Flips the selection — or the whole track if nothing is selected. | |
| Show only selected | ⇧+T | Collapses the waveform to show only the selected area. | |
| Track Volume | — | Dragging (or holding Cmd) shifts the whole volume curve up or down at once. | |
| Volume Automation | — | Volume automation: drag the line to add a point and move it (also Cmd+⌥). Right-click or ⌥-click picks Points / Curve (dot on the button): in Curve mode, dragging between points bends the curve. | |
| Save Composition | ⇧+C | Stores the track's edits as a composition. | |
| Clear Composition | ⌫ | Resets the track to default and discards the edits. | |
| Undo | ⌘+Z | Undoes the last edit. | |
| Redo | ⌘+⇧+Z | Redoes an undone edit. | |
| Split View | ⇧+B | Splits the view into several panes. You can add more folders side by side in Split View. | |
| Add to Split View | — | A library row button: brings that folder or project into Split View alongside the others. |
FX
| FX (control bar) | ⇧+I | The FX block in the control bar: power switches the effect chain on (full wet, insert style), the name opens the FX dock beneath the waveform — TRACK and SEAM rows, plugins, presets and MIX. The dock and the EQ alternate in the same place. | |
| FX Automation | ⇧+F | Brings an automation lane onto the waveform. The default lane is FX Slot MIX (teal line): drag the line to add and move a point. Right-click lists the plugins in the track's chain and their automatable parameters, straight from the plugin — pick one and it gets its own amber lane whose readout shows the value with its unit. Several parameters can be automated side by side; ⌥-right-click removes a lane. Points / Curve live in the same menu. You can draw with FX off too — the readout says "FX off". The button does not switch the effect on; the FX block's power does. Curves are saved with the composition and rendered sample-accurately into exports. | |
| Include FX tail | — | The effect's tail, a reverb decay for instance, travels with the exported clip. On by default — the export sounds like the preview; switch it off for a dry cut. | |
| Order (drag) | — | In the FX dock, reorder plugins by dragging the chip. The order decides the order the effects run in. |
Export and drag-out
| Export Composition | — | Exports the whole composition as an audio file. | |
| Export Selection | — | Exports just the selected area. | |
| Drag out | — | Drag the finished clip straight into another app — a QLab cue list or the Finder, say. A clip marked as a loop stays seamless once dragged out. |
Soundstack
| Soundstack | — | Opens or closes the stack view, which replaces the waveform. The file table's Stack column adds (+) and removes sounds from the stack. | |
| Select All / Select None | — | Selects and activates every block in full — use it before a group move or Clip to Selection. With everything selected, the same button clears the selections. | |
| Crossfade seam | — | Appears where two blocks overlap in time — adds a crossfade between them. | |
| Shared playhead | — | A line spanning the full height of the panel. Drag it, or click empty space, to move it. Enter returns it to the start. | |
| Timeline | — | At the top of the panel. Clicking moves the playhead; dragging an empty stretch paints a loop region that Loop cycles regardless of the stack's contents. Double-click removes the region. The white band from a multi-track selection slides the whole shared selection. | |
| Save Stack | — | No save dialog: a name prompt appears in the sidebar and your next click picks the location — the Soundstacks section stores an editable arrangement, a Sounds/Projects folder a rendered file (FORMAT "STACK"). Esc or a second press cancels. | |
| Soundstacks section | — | The sidebar's third section, for saved stacks. Clicking one reopens the arrangement for editing, + Add Folder creates a folder, ✕ moves an entry to the Trash (confirmed with a second press). | |
| Clear Stack | — | Empties the stack; confirmation is asked with a second press. |
Library and projects
| Show in Finder | — | Opens the folder or project in the Finder. | |
| New subfolder | — | Creates a new subfolder inside the project. | |
| Remove | — | Removes a folder from the library or a project from the list — from the list only, the files stay on disk. | |
| Paste files | ⌘+V | Pastes audio files from the clipboard into the active project or folder. |
Keyboard
| Selection start | I | Moves the selection start to the playhead. | |
| Selection end | O | Moves the selection end to the playhead. | |
| Search | ⌘+F | Focuses the search field from anywhere. Esc clears it. | |
| Add folder | ⇧⌘+O | Same as + Add Folder in the sidebar. |
Settings ⚙
| Appearance | — | The theme — Booth is the deepest black for a dark control booth (default), Studio a neutral dark for daytime work and Daylight the bright one — plus the list text size (S/M/L). Theme control in the top bar adds three theme buttons next to the volume knob. The Sidebar tab chooses which sidebar sections are visible. | |
| Controls | — | Which transport buttons are shown and in what order. Reset to default order restores the default. | |
| Keyboard shortcuts | — | Click an action and press a new key. Clearing removes the key entirely — which is not the same as restoring the default. | |
| FX dock | — | The plugin chain is managed in the FX dock (the FX chip in the control bar). Rescan looks for installed Audio Unit plugins again. Support covers Verified plugins that have passed SOUNDINDX's test protocol — currently Apple's own AU effects; third-party plugins (Waves and others) are added to the list as they are tested. Others usually work but are outside support. | |
| Licence | — | Activate unlocks the app with a licence key. Deactivate this Mac frees the seat for another machine. A tester key (starts with RMK-TRIAL) extends the trial until the key's date, no network needed. |
The arrow keys are reserved for browsing the track list and cannot be assigned to anything else — the same key would then mean two things. Everything else is free to change.

Viisi minuuttia — koko työnkulku
- Avaa käsikirjoitus PDF:nä (⌘O). Merkinnät tallentuvat PDF:n viereen omaan tiedostoonsa, PDF:ään ei kosketa.
- Merkitse isku: paina CUE-kuvaketta ja maalaa sanat, joiden kohdalla isku lähtee. Laatikko lukittuu kokonaisiin sanoihin, selite kirjoitetaan laatikon alle.
- Aja esitys: valmiusnäyttö kertoo seuraavan iskun, välilyönti tai Return = GO, askelpalautin = takaisin.
- Anna esitysjärjestelmän kääntää sivut: Settings › OSC IN (esim. QLab) tai MIDI/MSC valopöydältä. Sovellus vain kuuntelee, se ei koskaan lähetä komentoja.
1. Käsikirjoituksen avaaminen
File › Open Script (⌘O) tai aloitusnäkymän Open script. Mikä tahansa PDF, jossa on tekstikerros, kelpaa: Wordista, Pagesista tai Final Draftista viety tai OCR-käsitelty skannaus. Sivu rajataan automaattisesti tekstialueeseen, ja Settings › View › Exclude page numbers from crop pudottaa sivunumerot pois rajauksesta.
Viimeksi avatut löytyvät File › Open Recent -valikosta ja aloitusnäkymästä. Save (⌘S) kirjoittaa merkinnät heti levylle ja tekee varmuuskopion; Save Script As (⇧⌘S) tallentaa PDF:n ja merkinnät yhdessä uuteen nimeen ja jatkaa siitä.
2. Iskujen merkitseminen
CUE-kuvake (⌘E) avaa merkkaustilan. Maalaa tai napauta sanoja: laatikko lukittuu kokonaisiin sanoihin, ja selite kirjoitetaan suoraan laatikon alle. Sivu avaa selitteelle raon rivien väliin, joten mikään ei peitä tekstiä. Rivinvaihto selitteeseen tulee ⇧+Enterillä.
Klikkaus valitsee iskun, tuplaklikkaus avaa sen asetukset (numero, tyyppi, väri, muistiinpano). Valitun iskun voi poistaa askelpalauttimella, ja laatikon reunaa venytetään sivukahvoista, jotka lukittuvat nekin sanoihin. Iskut numeroidaan lukujärjestyksessä; väliin lisätty isku saa desimaalin (2 → 2.5 → 3), ja listan 1·2·3-nappi siistii numerot kokonaisluvuiksi. Kaikki merkintätoimet kumoutuvat ⌘Z:lla.
Settings › General › Cue marking › Mark snaps to: Whole words (oletus) tai Letters, jos haluat kirjaintarkan reunan.
Cue types: iskun tyyppi on nimi ja väri, ja lista on sinun. Oletuksena CUE, SFX, LFX, VFX ja INFO; voit nimetä, värittää, poistaa ja lisätä tyyppejä Settings › General › Cue types -kohdassa (valmiina myös FLY, STG, MIC, CALL, FX). Listan ensimmäinen tyyppi on uuden iskun oletus. Isku saa tyyppinsä värin, ellet anna sille omaa väriä sen asetuksista. Tyyppi voi olla mikä tahansa ajajan toimenpide tai pelkkä huomio.
3. Yliviivaus ja piilotus
Harjoituksissa tehdyt leikkaukset merkitään suoraan sivulle. Yliviivaus (viivattu T) vetää viivan sanojen läpi ja himmentää ne; piilotus (silmä) peittää sanat kokonaan. Kumpikin tehdään maalaamalla, monirivinen valinta merkitään rivi kerrallaan vain valittuihin sanoihin. Klikkaus valitsee merkinnän, askelpalautin poistaa, kaksoisklikkaus poistaa suoraan.
4. Esityksen ajo
Vasemman reunan valmiusnäyttö kertoo, mikä isku lähtee seuraavaksi. Välilyönti tai Return = GO, askelpalautin = edellinen, nuolet ylös/alas siirtävät valmiuden, nuolet vasen/oikea kääntävät sivua. Reset Run (⇧⌘R) palauttaa esityksen alkuun. Ajon kohta tallentuu, joten keskeytynyt ajo jatkuu samasta kohdasta.
Dim Screen (⇧⌘D) himmentää näytön katsomoa varten. Yhden sivun tila (sivut-kuvake tai ⌘1) sopii kapeaan ikkunaan QLabin viereen; ⌘2 palauttaa aukeaman. Teemat Booth, Studio ja Daylight vaihtuvat työkalurivin alta tai View-valikosta.
5. Ohjaus esitysjärjestelmästä
SCRIPTINDX kuuntelee OSC:tä (Settings › Control › OSC IN, portti 53100), MIDI-nuotteja ja MSC-komentoja valopöydältä. Näin ajokirja seuraa esitystä: GO QLabista siirtää valmiuden ja kääntää sivun. Sovellus ei koskaan lähetä komentoja, joten esitys ajetaan edelleen QLabista. Oletuksena OSC hyväksytään vain tältä koneelta; toiselta koneelta ohjaava pöytä vaatii asetuksen Accept OSC only from this Mac pois päältä.
Komennot: /go, /back, /standby <numero>, /cue <numero>, /page <sivu>, /page/next, /page/prev, /dim 1|0. Settings-ikkunan Control monitor näyttää saapuvat viestit.
6. Vienti ja toinen näyttö
File › Export Marked Script (⇧⌘E) tekee PDF:n, joka näyttää täsmälleen ruudun näkymältä raot ja selitteet mukaan lukien, paperivarmuuskopioksi. Show › Confidence Monitor (⇧⌘M) avaa ajajan konsolinäytön toiselle ruudulle: iso valmiusnumero ja seuraavat iskut.
7. Kokeilu ja lisenssi
Sovellus toimii 14 päivää täysin ilman rajoituksia. Lisenssiavain syötetään kohtaan Settings › License (oma välilehti), ja Deactivate this Mac vapauttaa paikan toiselle koneelle. Testaajan avain (alkaa RMK-TRIAL) jatkaa kokeilua avaimen päivämäärään asti ilman verkkoa. Hinta on 49 € kertamaksuna kolmelle Macille; myynti avataan pian.
Five minutes — the whole workflow
- Open the script as a PDF (⌘O). Marks are saved beside the PDF in their own file; the PDF is never touched.
- Mark a cue: press the CUE icon and drag over the words the cue fires on. The box snaps to whole words; the label is typed right under it.
- Run the show: the standby display shows the next cue, Space or Return is GO, Backspace goes back.
- Let the show system turn the pages: Settings › OSC IN (QLab, for example) or MIDI/MSC from the lighting desk. The app only listens; it never sends commands.
1. Opening a script
File › Open Script (⌘O) or Open script on the start screen. Any PDF with a text layer works: exported from Word, Pages or Final Draft, or a scan with OCR. The page is cropped to its text area automatically, and Settings › View › Exclude page numbers from crop keeps page numbers out of the crop.
Recent scripts are in File › Open Recent and on the start screen. Save (⌘S) writes the marks to disk immediately and rotates a backup; Save Script As (⇧⌘S) saves the PDF and the marks together under a new name and continues from the copy.
2. Marking cues
The CUE icon (⌘E) enters marking mode. Drag over or tap words: the box snaps to whole words, and the label is typed directly under the box. The page opens a gap between the lines for the label, so nothing covers the text. ⇧+Enter adds a line break to a label.
A click selects a cue, a double-click opens its settings (number, type, colour, note). Backspace deletes the selected cue, and the side handles stretch the box, snapping to words as well. Cues are numbered in reading order; a cue inserted in between gets a decimal (2 → 2.5 → 3), and the 1·2·3 button in the list renumbers them as whole numbers. Every marking action can be undone with ⌘Z.
Settings › General › Cue marking › Mark snaps to: Whole words (default) or Letters for a character-exact edge.
Cue types: a cue type is a name and a colour, and the list is yours. The defaults are CUE, SFX, LFX, VFX and INFO; rename, recolour, remove or add types under Settings › General › Cue types (FLY, STG, MIC, CALL and FX are ready as presets). The first type in the list is the default for new cues. A cue takes its type's colour unless you give it one of its own in its settings. A type can be any operator action, or just a note to watch for.
3. Strike and hide
Cuts from rehearsal go straight onto the page. Strike (the crossed T) draws a line through the words and dims them; Hide (the eye) blanks them completely. Both are made by dragging; a multi-line selection is marked line by line, only on the selected words. A click selects a mark, Backspace removes it, a double-click removes it directly.
4. Running the show
The standby display on the left shows which cue fires next. Space or Return is GO, Backspace steps back, the up and down arrows move the standby, the left and right arrows turn pages. Reset Run (⇧⌘R) returns to the top. The run position is saved, so an interrupted run continues where it stopped.
Dim Screen (⇧⌘D) darkens the screen for the house. One-page mode (the pages icon or ⌘1) fits a narrow window beside QLab; ⌘2 restores the spread. The Booth, Studio and Daylight themes are under the tool row or in the View menu.
5. Control from the show system
SCRIPTINDX listens to OSC (Settings › Control › OSC IN, port 53100), MIDI notes and MSC from the lighting desk, so the cue book follows the show: a GO from QLab advances the standby and turns the page. The app never sends commands, so the show still runs from QLab. By default OSC is accepted only from this Mac; a desk on another machine needs Accept OSC only from this Mac switched off.
Commands: /go, /back, /standby <number>, /cue <number>, /page <page>, /page/next, /page/prev, /dim 1|0. The Control monitor in the Settings window shows incoming messages.
6. Export and a second screen
File › Export Marked Script (⇧⌘E) writes a PDF that looks exactly like the screen, gaps and labels included, as the printed backup. Show › Confidence Monitor (⇧⌘M) opens the operator's console on a second display: a big standby number and the next cues.
7. Trial and licence
The app runs for 14 days with no limits. A licence key goes under Settings › License, and Deactivate this Mac frees the seat for another machine. A tester key (starts with RMK-TRIAL) extends the trial until the key's date, no network needed. The price is 49 € one-time for three Macs; sales open soon.

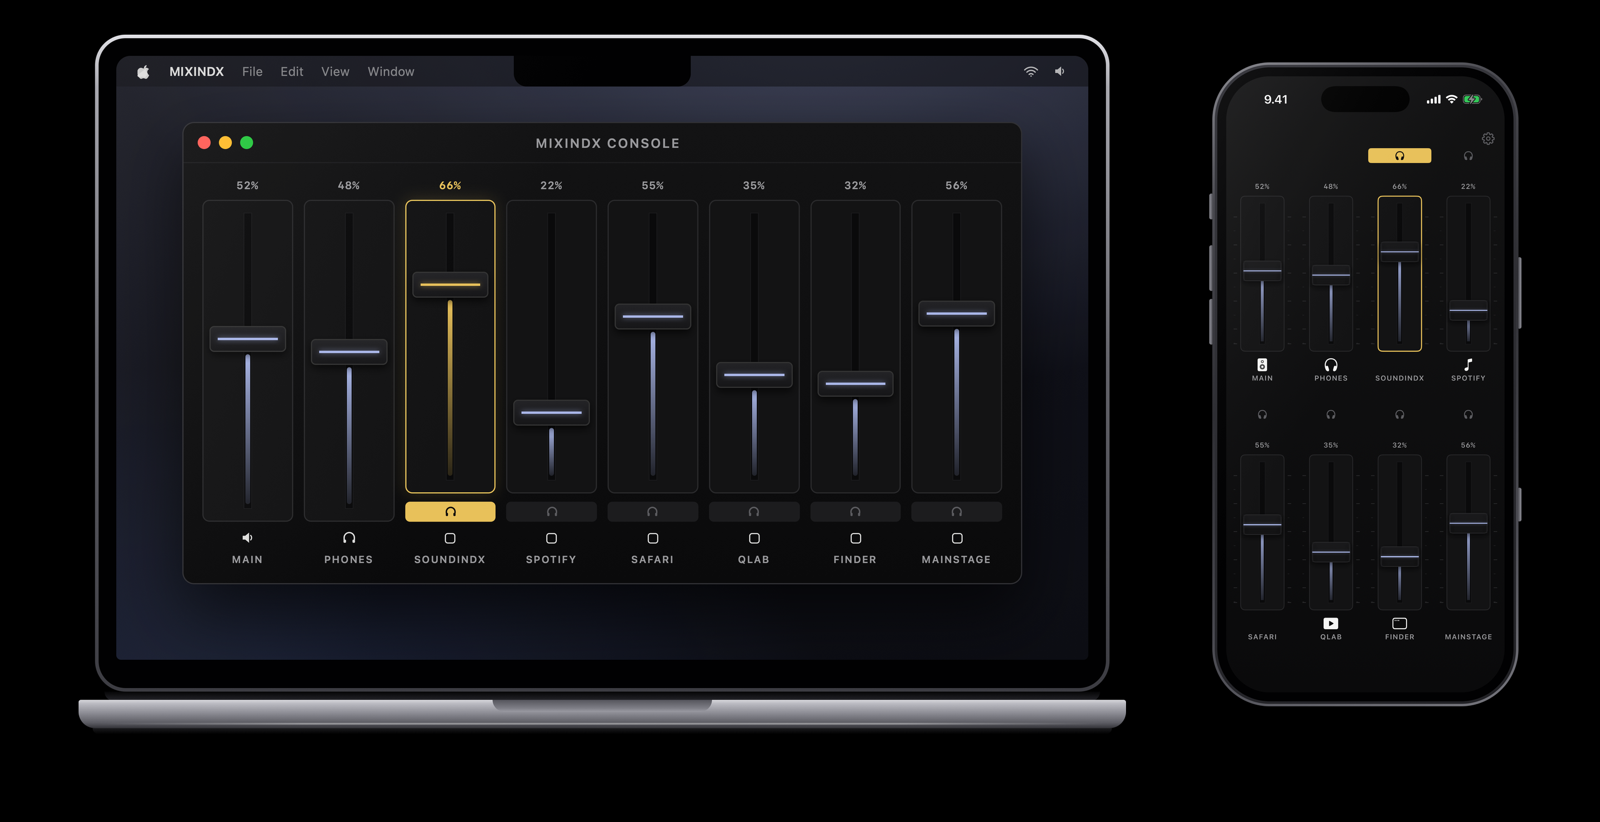
Mikseri valikkorivissä, ja iPhone langattomana ohjauspintana.
1. Käynnistys ja luvat
MIXINDX asuu valikkorivissä. Ensimmäisellä käynnistyksellä macOS kysyy lupaa äänen kaappaamiseen — ilman sitä sovellus ei voi säätää muiden sovellusten ääntä. Klikkaa kuvaketta, niin näet kanavaliuskat kaikista parhaillaan ääntä tuottavista sovelluksista.
Anna lupa loppuun asti ja odota hetki. Sovellus rakentaa kaappauksen uudelleen automaattisesti lupakyselyn jälkeen. Faderin vetäminen takaisin maksimiin palauttaa sovelluksen aina omaan ääneensä.
2. Kanavakohtainen säätö
Jokaisella sovelluksella on oma faderinsa, mykistyksensä ja mittarinsa. Oikea klikkaus liuskan päällä avaa lisätoiminnot, kuten Reset to 100%, joka vapauttaa sovelluksen takaisin järjestelmän omaan reittiin.
3. MAIN ja PHONES
MIXINDX:ssä on kaksi väylää. MAIN on se mitä yleisö tai tila kuulee, PHONES se mitä sinä kuuntelet. PHONES elää monikanavaisen äänikortin omilla kanavapareilla — esimerkiksi RME Babyface Pro FS:llä monitorit ovat kanavilla 1/2 ja kuulokeliitäntä kanavilla 3/4. Kun tällainen kortti on MAIN-laitteena, PHONES herää itsestään: voit esikuunnella yksittäisen sovelluksen PFL-napista ilman että se kuuluu MAIN ulostulossa, ja PHONES-väylän oma fader säätää kuulokekuuntelun tasoa. Kahden kanavan laitteilla (esim. pelkkä kuulokeadapteri) PHONES-väylää ei ole.
RME Babyface Pro FS. TotalMix FX:n reititys voi ohittaa MIXINDXin — jos MAIN-ohjelma kuuluu kuulokkeissa PFL:stä riippumatta, paina PHONES-lohkon Reset TotalMix routing. Se vaatii että TotalMixissä on Enable OSC Control (Options → Settings → OSC) ja Submix linked to OSC control (Options-valikko) päällä. Tukea muille korteille lisätään sitä mukaa kun niitä saadaan testiin.
Reitityksen tarkistaa nopeimmin TotalMixin Matrix-näkymästä (Window → Matrix): rivit ovat lähteitä, sarakkeet laitteen lähtöjä, ja vihreä solu on reitti. Oikeassa tilassa Software Playback -rivit muodostavat puhtaan diagonaalin — AN 1/2 vain omaan lähtöönsä, PH 3/4 vain omaansa, ei yhtään solua ristiin. Jos playback AN 1/2:n rivillä on solu kuulokelähdön sarakkeessa, se on vuoto: MAIN-ohjelma soi kuulokkeisiin MIXINDXin ohi, eikä PFL tai PHONES-fader vaikuta siihen. Klikkaa ylimääräinen solu pois — tai anna MIXINDXin Reset-napin tehdä se.
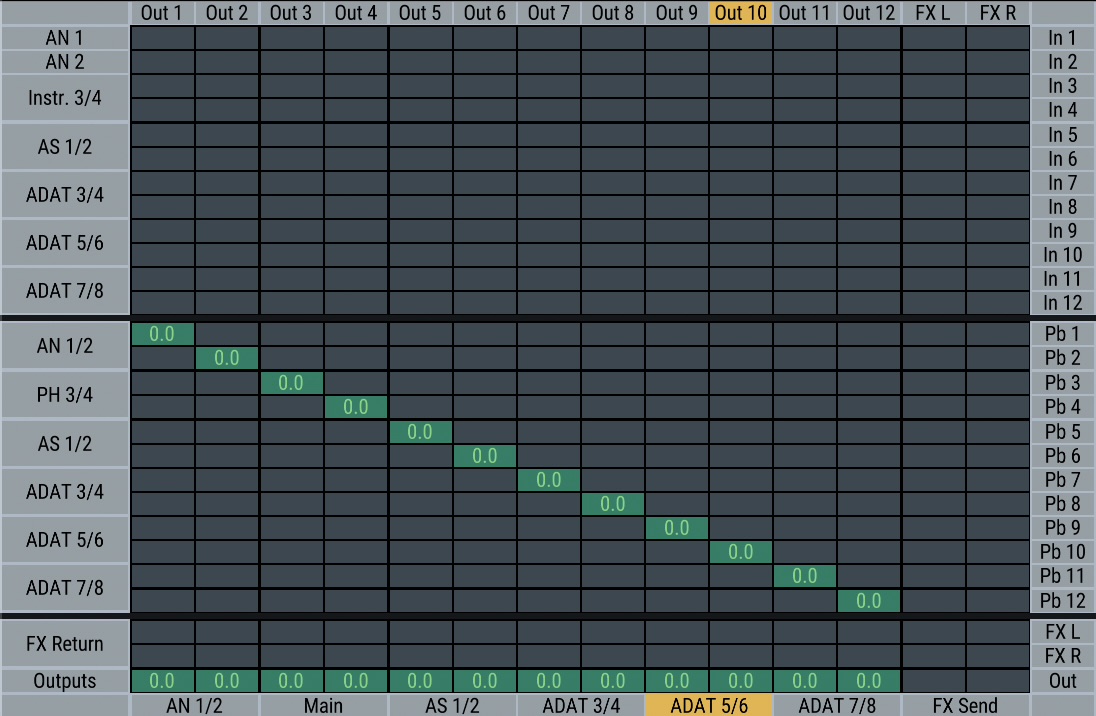
Matrix oikeassa tilassa: playback-parit puhtaana diagonaalina, sisääntulorivit tyhjinä.
Sovellus voidaan myös reitittää suoraan tietylle laitteelle vetämällä sen liuska laitteen kohdalle.
4. iPhone-ohjain
Asenna MIXINDX Companion TestFlightistä. Kun puhelin on samassa verkossa, se löytää Macin automaattisesti ja paritetaan PIN-koodilla. Sen jälkeen faderit ovat kädessäsi ja puhelimesi toimii Mac OS mikserinä.
Kyse on lähes aina Local Network -luvasta. Avaa sovelluksen asetukset — se kertoo tilanteen ja vie napista suoraan iPhonen asetuksiin, joista lupa annetaan.
5. MIDI-ohjaus
Oikea klikkaus liuskan päällä → Learn MIDI, ja liikuta kontrollerisi säädintä. Kyseinen CC ohjaa siitä eteenpäin sitä faderia. Sama toimii järjestelmän ulostulolle ja sisääntulolle.
6. Latenssi ja lisenssi
Settings → Latency → Buffer size asettaa äänitapin puskurikoon (Automatic, 1024 … 32). Pienempi on nopeampi; laite pyöristää lähimpään tukemaansa kokoon, ja mitattu viive näkyy kytkimen vieressä. Licence… valikkorivin kuvakkeen oikeasta klikkauksesta: syötä ostettu avain tai vapauta tämän Macin paikka, kun siirryt toiselle koneelle. 30 päivän kokeilun jälkeen faderit vapautuvat, kunnes avain on syötetty.
The mixer in the menu bar, with an iPhone as a wireless control surface.
1. Launch and permissions
MIXINDX lives in the menu bar. On first launch macOS asks for permission to capture audio — without it the app cannot touch other applications' sound. Click the icon and you will see a channel strip for every app currently making noise.
Answer the permission prompt fully and wait a moment; the app rebuilds its capture automatically once permission is granted. Pulling a fader back to maximum always releases that app to its own audio path.
2. Per-app control
Every application gets its own fader, mute and meter. Right-clicking a strip opens more, including Reset to 100%, which hands the app back to the system's own output path.
3. MAIN and PHONES
MIXINDX has two buses. MAIN is what the room or the audience hears; PHONES is what you listen to. PHONES lives on a multichannel interface's own channel pairs — on an RME Babyface Pro FS the monitors sit on channels 1/2 and the headphone jack on 3/4. With such an interface as the MAIN device, PHONES comes alive by itself: audition a single app with PFL without it reaching the MAIN output, and the PHONES bus fader sets your headphone listening level. On two-channel devices (a plain headphone adapter, say) there is no PHONES bus.
RME Babyface Pro FS. TotalMix FX routing can bypass MIXINDX — if the MAIN programme is audible in the headphones regardless of PFL, press Reset TotalMix routing in the PHONES section. It needs Enable OSC Control (Options → Settings → OSC) and Submix linked to OSC control (Options menu) turned on in TotalMix. Support for more interfaces is added as they reach the bench.
The quickest way to check the routing is TotalMix's Matrix view (Window → Matrix): rows are sources, columns are the device's outputs, and a green cell is a route. In the correct state the Software Playback rows form a clean diagonal — AN 1/2 only to its own output, PH 3/4 only to its own, nothing crossing over. A cell on the playback AN 1/2 row under the headphone output column is the leak: the MAIN programme plays into the headphones past MIXINDX, and neither PFL nor the PHONES fader can touch it. Click the stray cell away — or let MIXINDX's Reset button do it.
The Matrix in its correct state: playback pairs on a clean diagonal, input rows empty.
An app can also be routed straight to a chosen device by dragging its strip onto that device.
4. The iPhone remote
Install MIXINDX Companion from TestFlight. On the same network it finds the Mac by itself and pairs with a PIN. After that the faders are in your hand, and your phone works as the Mac's mixer.
It is nearly always the Local Network permission. Open the app's settings: it explains the situation and takes you straight to the right page in iPhone Settings.
5. MIDI control
Right-click a strip → Learn MIDI, then move a control on your controller. That CC drives that fader from then on. The same works for the system output and input.
6. Latency and licence
Settings → Latency → Buffer size sets the audio tap's I/O buffer (Automatic, 1024 … 32). Smaller is faster; the device rounds to the nearest size it supports, and the measured round-trip is shown next to the switch. Licence… from the menu bar icon's right-click menu: enter a purchased key, or hand this Mac's seat back when you move to another machine. After the 30-day trial the faders release until a key is entered.

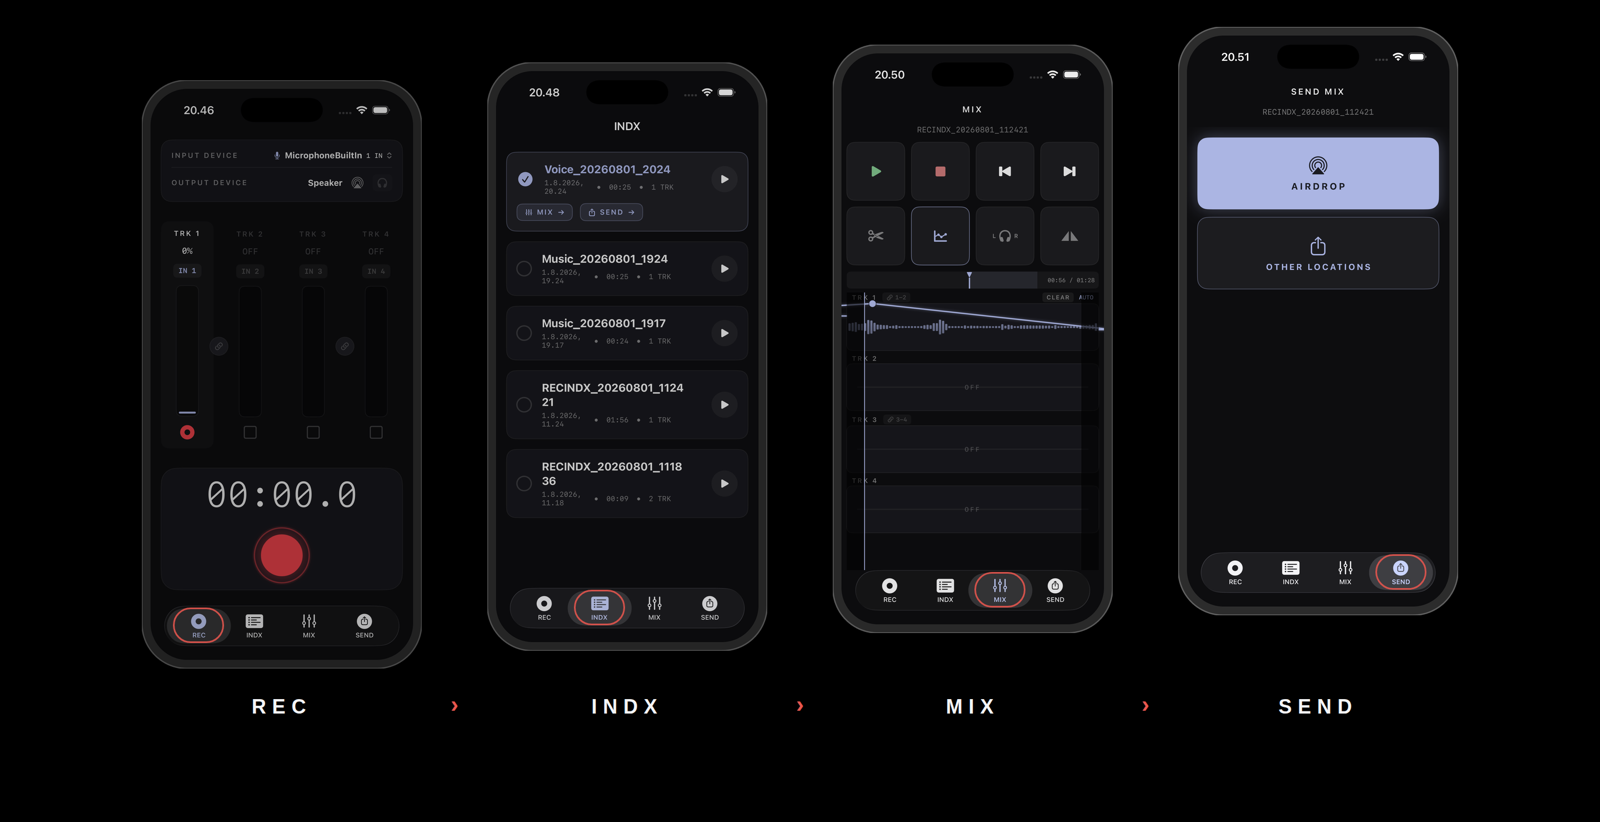
Neljä raitaa, äänirautatuki ja suoraviivainen työnkulku.
Työnkulku: REC – INDX – MIX – SEND
RECINDX on rakennettu yhden ketjun ympärille, ja sovellus vie sinut sen läpi samassa järjestyksessä joka kerta.
- REC — 1–4 raitaa. Puhelimen oma mikrofoni riittää, mutta kytkemällä Audio interfacen saat käyttöön sen kaikki sisääntulot.
- INDX — merkitse ja nimeä otot heti äänityksen jälkeen.
- MIX — editoi ja miksaa tasot ja balanssi raitojen välillä.
- SEND — lähetä valmis mixdown joko AirDropilla tai muihin lokaatioihin.
Four tracks, audio interface support and a straightforward workflow.
The workflow: REC – INDX – MIX – SEND
RECINDX is built around a single chain, and the app walks you through it in the same order every time.
- REC — 1–4 tracks. The phone's own microphone is enough, but connecting an audio interface gives you all of its inputs.
- INDX — mark and name the takes right after recording.
- MIX — edit and mix levels and balance between the tracks.
- SEND — send the finished mixdown via AirDrop or to other locations.